---
sidebar_label: Owners
toc_max_heading_level: 3
doc_id: 73319a65-d683-42d0-8238-2b544b5913be
description: >-
Assign an action item to one person so everyone can tell who's working on it.
Set the owner from the dashboard or the API, and filter your list by owner.
keywords:
- action items
- owner
- assignee
- assignment
- triage
- governance
---
import Tabs from '@theme/Tabs';
import TabItem from '@theme/TabItem';
# Action item owners
Every action item is scoped to a place in your [NRN](/docs/NRN) hierarchy, so you always know which team is responsible for it. An **owner** narrows that down to one person: whoever is working on the item.
Ownership is optional, and it isn't permanent. Items start out unassigned, so anyone can pick one up, pass it to a teammate, or hand it back.
## Assign an owner
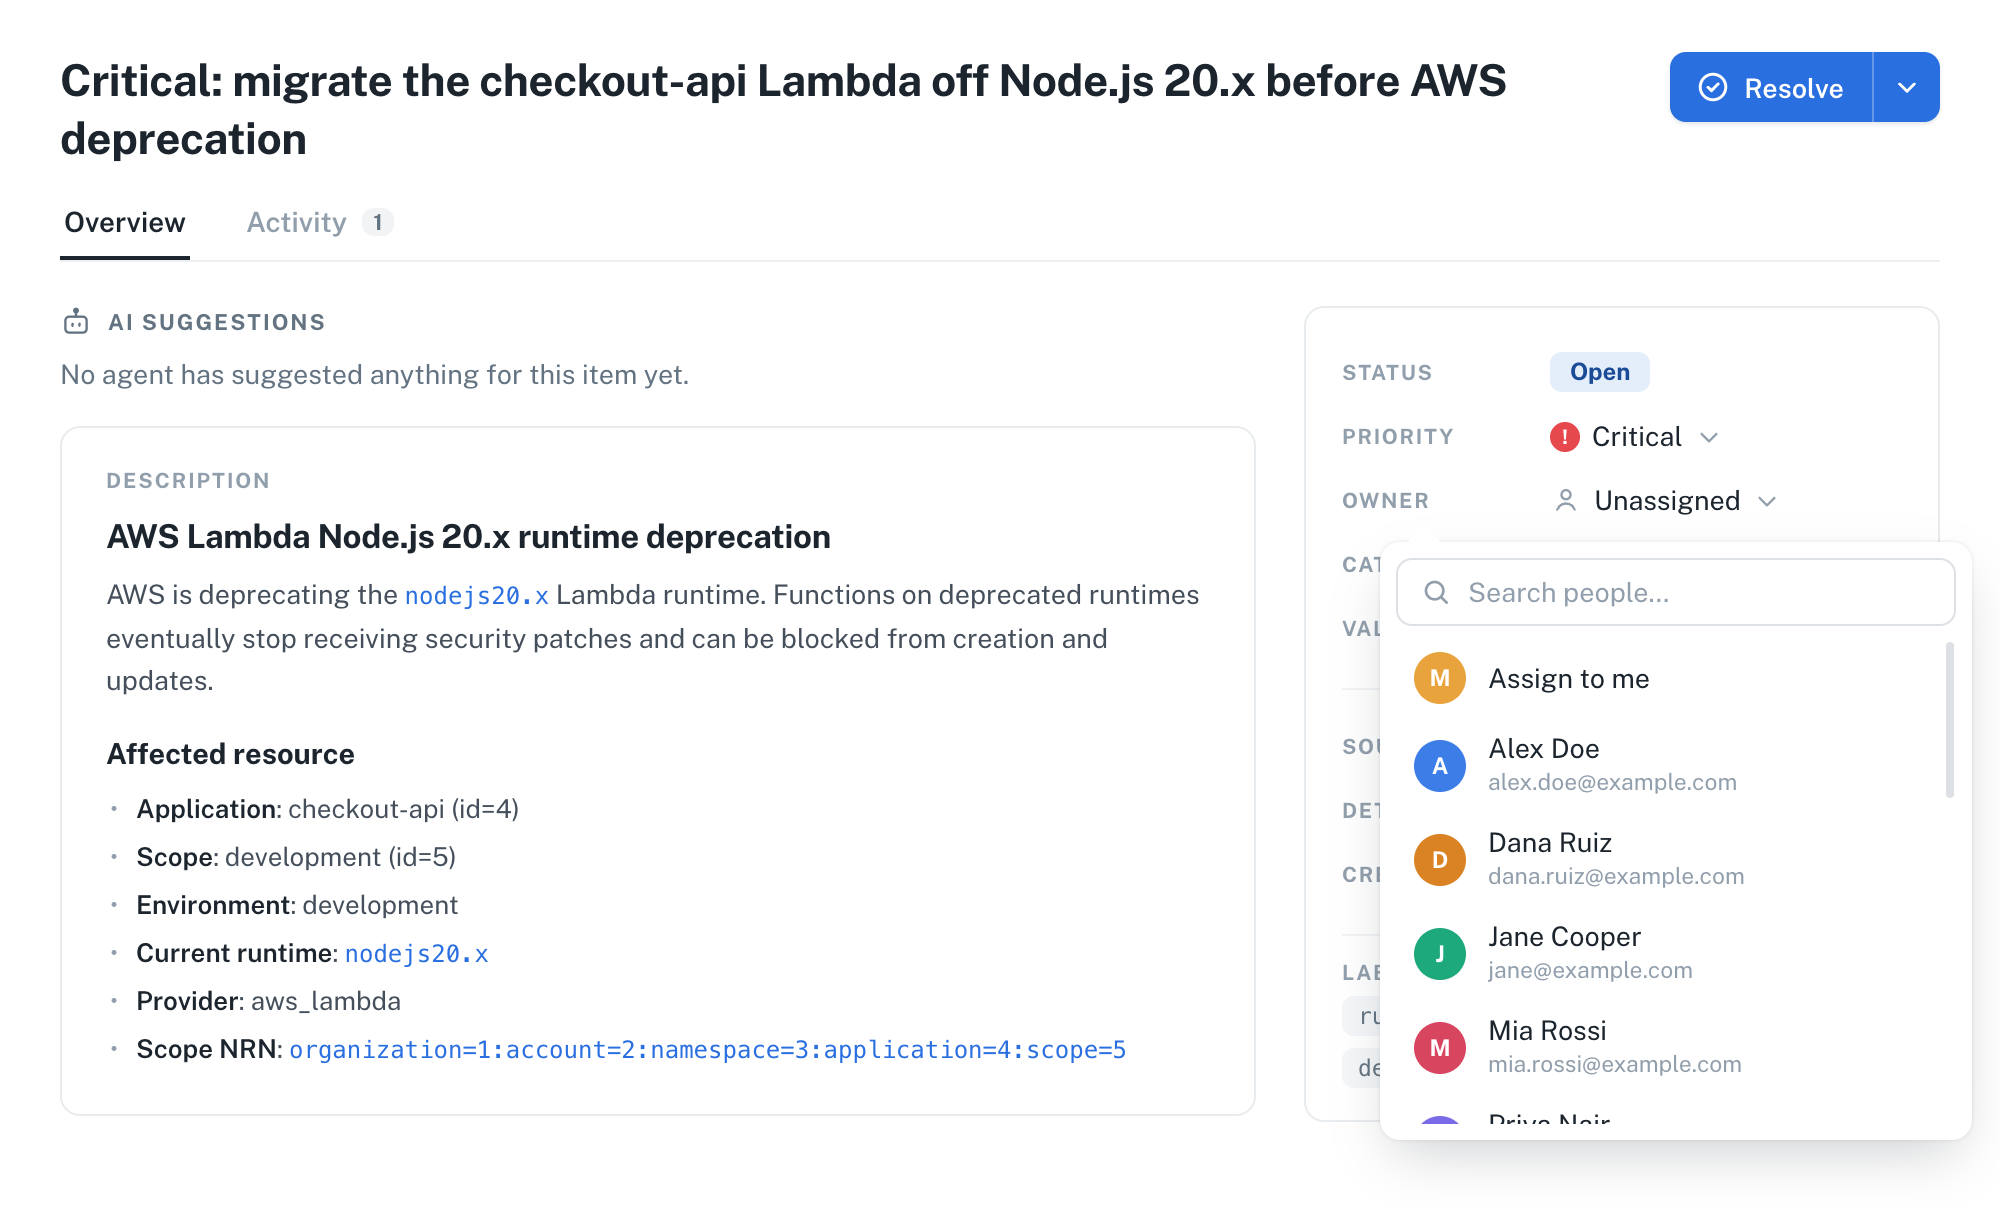
You can set the owner from the **Owner** column in the action items list, or from the **Owner** field in an item's detail view. Both open the same picker.
1. Go to **Manage > Action Items** from the application sidebar.
2. Click the **Owner** cell of the item you want to assign. In the detail view, click the **Owner** field instead.
3. Click **Assign to me** to take the item, or search for a teammate by name or email. The search covers everyone in your organization, not only the names already on the list.
4. Click the person you want. The item is assigned right away, with no confirmation step.
> ℹ️ **Note:** The picker only lists people. Machine identities such as API keys are never offered as owners.
 Send a [POST request](/docs/api/action-item-assign) to `/action_item/{id}/assign` with the nullplatform user ID of the new owner. The response is the updated item.
```bash
curl -L -X POST 'https://api.nullplatform.com/action_item/xYz789AbCdEf/assign' \
-H 'Content-Type: application/json' \
-H 'Authorization: Bearer ' \
-d '{
"user_id": 2345
}'
```
:::note
You can only change the owner while an item still represents work: `open`, `deferred`, `pending_deferral`, `pending_verification`, and `pending_rejection`. Once an item reaches `resolved`, `rejected`, or `closed`, the dashboard hides the control and the API answers `400`.
:::
## Change or remove the owner
An item has one owner at a time, so assigning someone to an item that already has one reassigns it. Unassigning returns the item to the unassigned pool, which is what you want when you're not the right person for it, or when you're handing it back for someone else to pick up.
1. Click the current owner in the **Owner** column, or the **Owner** field in the item's detail view.
2. Pick a different person to reassign the item.
3. To leave the item unassigned, click **Unassign** at the bottom of the picker.
Reassigning uses the same endpoint as assigning. Send the [assign request](/docs/api/action-item-assign) again with a different `user_id`, and the new owner replaces the previous one:
```bash
curl -L -X POST 'https://api.nullplatform.com/action_item/xYz789AbCdEf/assign' \
-H 'Content-Type: application/json' \
-H 'Authorization: Bearer ' \
-d '{
"user_id": 6789
}'
```
To release an item, send a [POST request](/docs/api/action-item-unassign) to `/action_item/{id}/unassign`. It takes no body, and unassigning an item that nobody owns answers `400`:
```bash
curl -L -X POST 'https://api.nullplatform.com/action_item/xYz789AbCdEf/unassign' \
-H 'Authorization: Bearer '
```
## Filter by owner
The action items list has an **Owner** filter, next to the category, priority, and status ones. It takes several people at once, and **Unassigned** is one of the choices, so you can see your own items together with the ones still up for grabs instead of switching between two views.
Over the API, the listing accepts `assignee_id` as a comma-separated list, where `none` stands for the unassigned pool. This is what that combined view sends:
```bash
curl -L -X GET 'https://api.nullplatform.com/action_item?assignee_id=none,2345&status_not_in=closed,rejected' \
-H 'Authorization: Bearer '
```
To see how the work is spread across the team instead, open the [board](/docs/action-items/triage-and-resolve#the-board-view) and set **Group by** to owner. The cards split into one horizontal lane per person, so you can tell at a glance who's carrying what.
## Track ownership changes
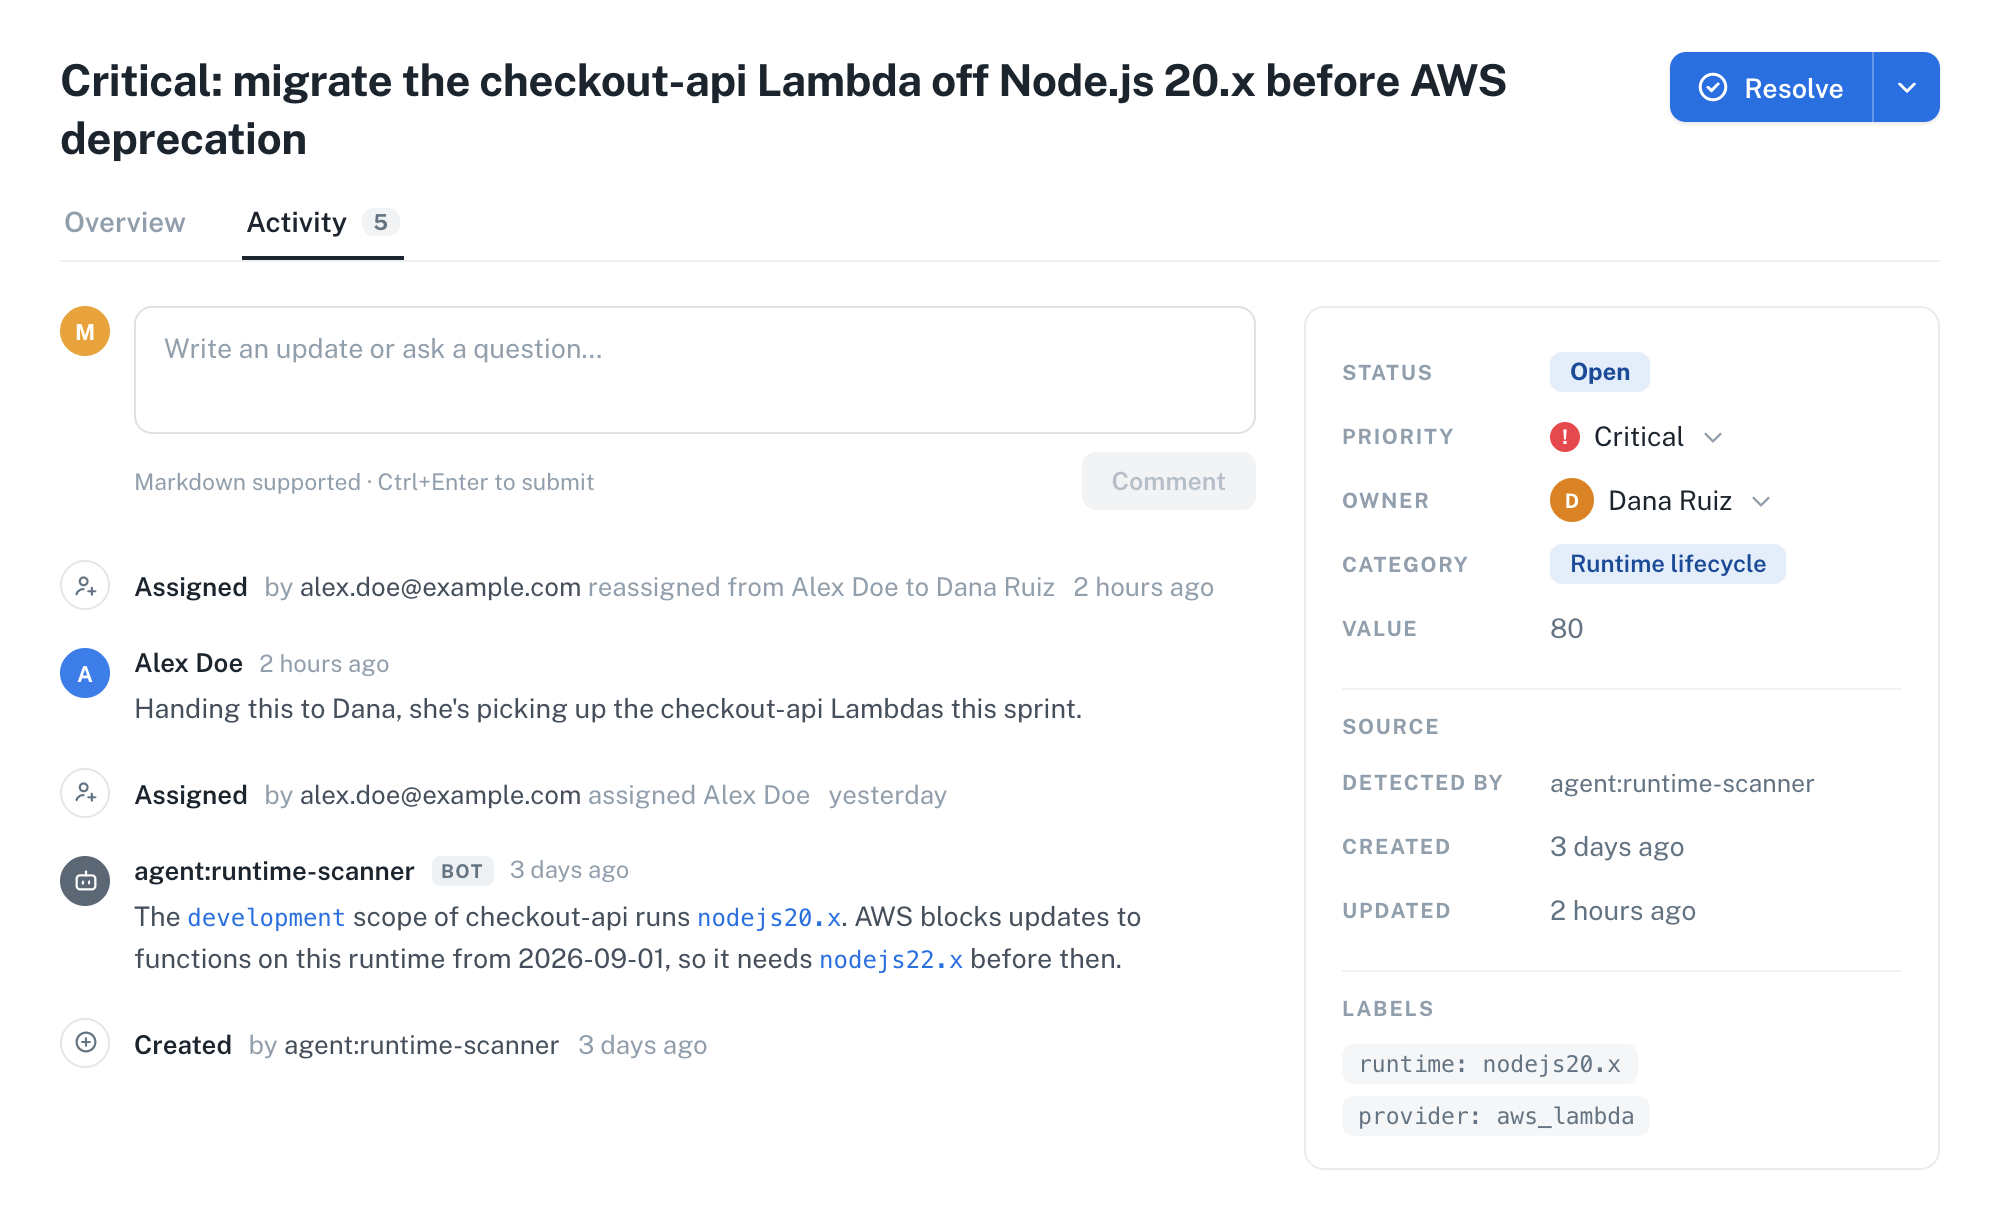
Every assignment and every release is recorded on the item, so the **Activity** tab reads as a history of who picked the work up and when. They show up as **Assigned** and **Unassigned** entries with the actor and the timestamp, and a reassignment names both the previous and the new owner.
Comments share the same chronology, so the reason for a handover sits right next to the handover itself.
Send a [POST request](/docs/api/action-item-assign) to `/action_item/{id}/assign` with the nullplatform user ID of the new owner. The response is the updated item.
```bash
curl -L -X POST 'https://api.nullplatform.com/action_item/xYz789AbCdEf/assign' \
-H 'Content-Type: application/json' \
-H 'Authorization: Bearer ' \
-d '{
"user_id": 2345
}'
```
:::note
You can only change the owner while an item still represents work: `open`, `deferred`, `pending_deferral`, `pending_verification`, and `pending_rejection`. Once an item reaches `resolved`, `rejected`, or `closed`, the dashboard hides the control and the API answers `400`.
:::
## Change or remove the owner
An item has one owner at a time, so assigning someone to an item that already has one reassigns it. Unassigning returns the item to the unassigned pool, which is what you want when you're not the right person for it, or when you're handing it back for someone else to pick up.
1. Click the current owner in the **Owner** column, or the **Owner** field in the item's detail view.
2. Pick a different person to reassign the item.
3. To leave the item unassigned, click **Unassign** at the bottom of the picker.
Reassigning uses the same endpoint as assigning. Send the [assign request](/docs/api/action-item-assign) again with a different `user_id`, and the new owner replaces the previous one:
```bash
curl -L -X POST 'https://api.nullplatform.com/action_item/xYz789AbCdEf/assign' \
-H 'Content-Type: application/json' \
-H 'Authorization: Bearer ' \
-d '{
"user_id": 6789
}'
```
To release an item, send a [POST request](/docs/api/action-item-unassign) to `/action_item/{id}/unassign`. It takes no body, and unassigning an item that nobody owns answers `400`:
```bash
curl -L -X POST 'https://api.nullplatform.com/action_item/xYz789AbCdEf/unassign' \
-H 'Authorization: Bearer '
```
## Filter by owner
The action items list has an **Owner** filter, next to the category, priority, and status ones. It takes several people at once, and **Unassigned** is one of the choices, so you can see your own items together with the ones still up for grabs instead of switching between two views.
Over the API, the listing accepts `assignee_id` as a comma-separated list, where `none` stands for the unassigned pool. This is what that combined view sends:
```bash
curl -L -X GET 'https://api.nullplatform.com/action_item?assignee_id=none,2345&status_not_in=closed,rejected' \
-H 'Authorization: Bearer '
```
To see how the work is spread across the team instead, open the [board](/docs/action-items/triage-and-resolve#the-board-view) and set **Group by** to owner. The cards split into one horizontal lane per person, so you can tell at a glance who's carrying what.
## Track ownership changes
Every assignment and every release is recorded on the item, so the **Activity** tab reads as a history of who picked the work up and when. They show up as **Assigned** and **Unassigned** entries with the actor and the timestamp, and a reassignment names both the previous and the new owner.
Comments share the same chronology, so the reason for a handover sits right next to the handover itself.
 ## Next steps
- [Triage and resolve action items](/docs/action-items/triage-and-resolve): decide what happens to the items you own
- [Action items overview](/docs/action-items): see how the detect-triage-resolve cycle fits together
- [NRN](/docs/NRN): understand the hierarchy that scopes items to teams and applications
- [Assign an action item](/docs/api/action-item-assign): the endpoint reference for assignment
## Next steps
- [Triage and resolve action items](/docs/action-items/triage-and-resolve): decide what happens to the items you own
- [Action items overview](/docs/action-items): see how the detect-triage-resolve cycle fits together
- [NRN](/docs/NRN): understand the hierarchy that scopes items to teams and applications
- [Assign an action item](/docs/api/action-item-assign): the endpoint reference for assignment