Asset push authentication
When your pipeline runs np asset push, the CLI needs credentials to push the image to your registry (or the file to S3, for Lambda functions). It takes them from the asset repository provider configured in nullplatform, so your pipeline never has to hold registry secrets or run docker login.
How it authenticates depends on the provider:
- Docker registry (Docker Hub, GitHub Container Registry, Azure Container Registry, Google Artifact Registry, Harbor, self-hosted): the CLI logs in with the username and password stored in the provider.
- AWS ECR: the CLI gets an ECR login token with either an IAM role it assumes at push time using your CI tool's OpenID Connect (OIDC) token (recommended, no long-lived secrets anywhere), or a static access key pair stored in the provider.
If you'd rather log in from the pipeline yourself, pass --no-login and the CLI pushes with the session you already opened. See Logging in from the pipeline.
Docker registry
If your provider is a Docker registry, there's nothing AWS-related to configure. Nullplatform builds the image URL from the provider's Server URL and Registry Path, and the CLI runs docker login (or crane auth login when Docker isn't installed) with the provider's username and password before pushing. Any AWS setting, in the provider or on the command line, is ignored.
| Registry | Username | Password |
|---|---|---|
| Azure Container Registry | The service principal's application id | The service principal's secret |
| Google Artifact Registry / GCR | _json_key_base64 | The service account key, base64-encoded |
| Harbor, GitHub Container Registry, Docker Hub, self-hosted | A robot account or user | Its password or token |
ℹ️ Note: Rotating the registry credential is a change in the provider, not in your pipelines. Update the username or password there and every pipeline picks it up on its next push.
ECR
For an ECR provider, np asset push resolves AWS credentials in this order and stops at the first match:
--aws-role-arnon the command line. If you also pass--aws-access-key-idand--aws-secret-access-key, those keys are used to assume the role.--aws-access-key-idand--aws-secret-access-keyon the command line, used as they are.- The Role ARN configured in the provider.
- The Access Key and Secret Key configured in the provider.
If none applies, the command fails with a message listing what to configure. The region comes from --aws-region, then the provider's region, then AWS_REGION. For Docker images the CLI can also read it from the ECR registry hostname, so you rarely need to set it.
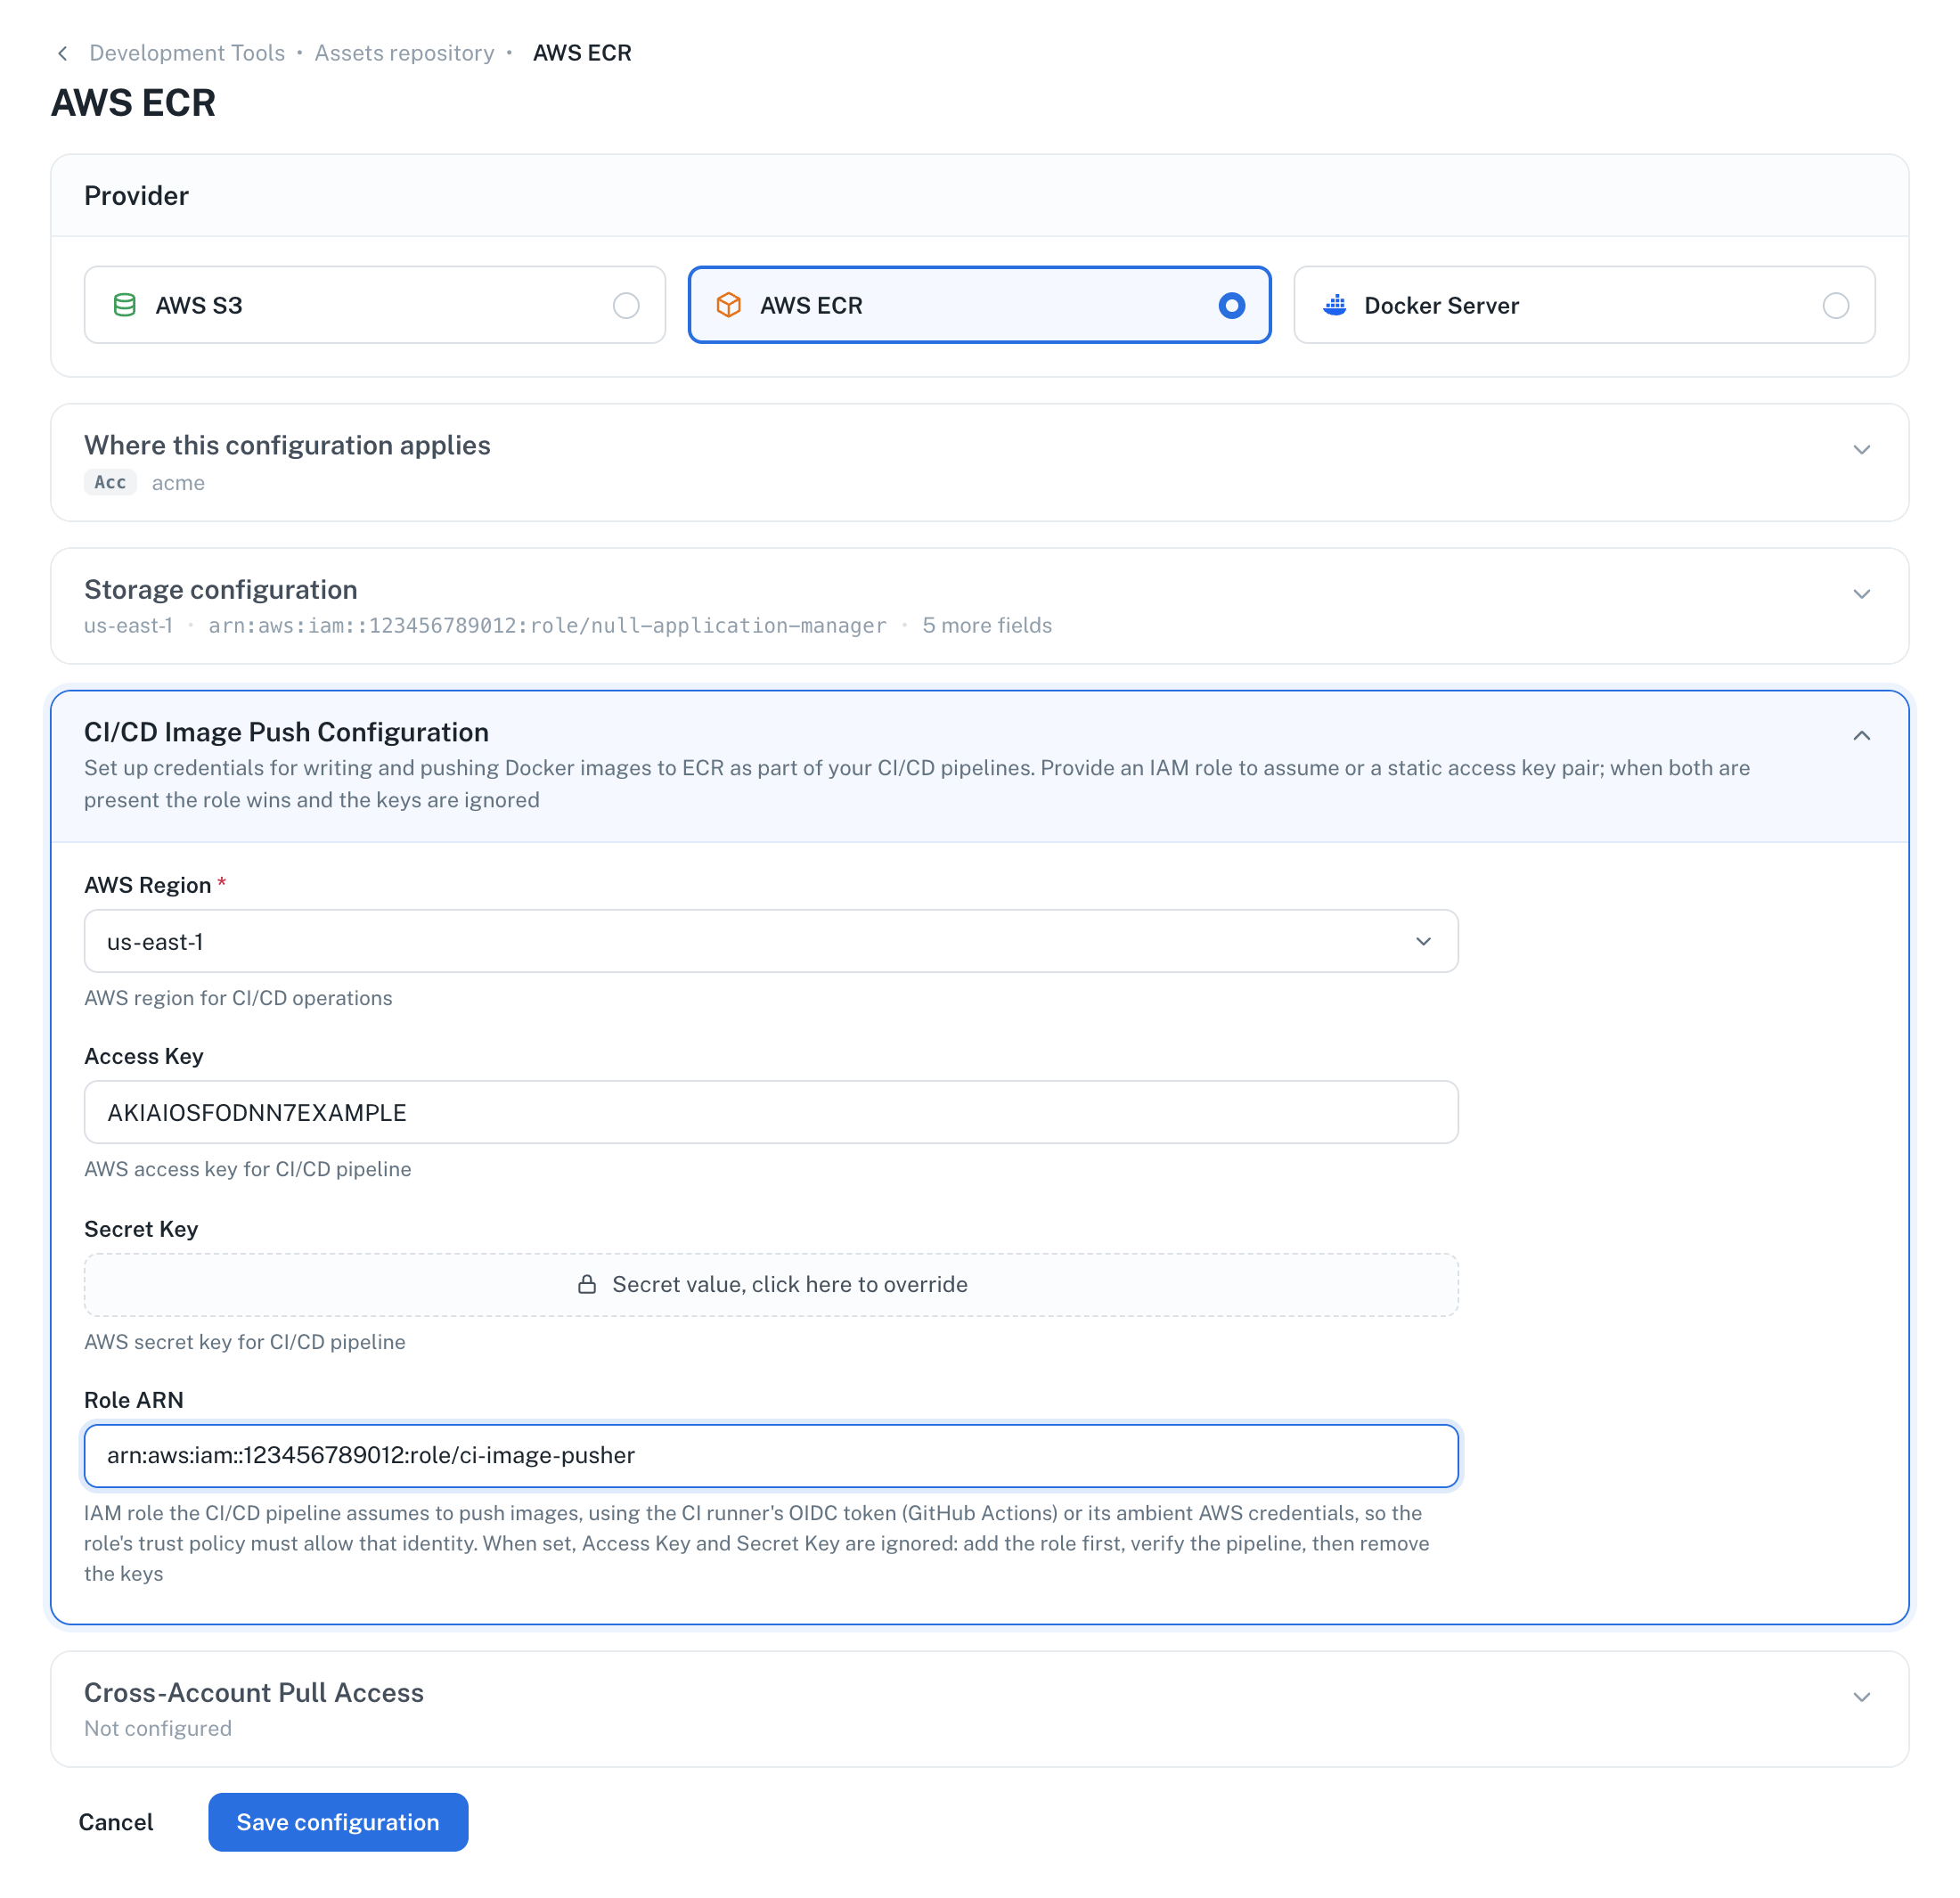
ℹ️ Note: Once a role is configured, the provider's keys are ignored. This lets you add the role while the keys are still there, confirm your pipelines work, and then remove the keys. If something goes wrong, remove the role and the pipelines fall back to the keys on their next run.
How the role is assumed
The CLI assumes the role with whatever identity the runner can present, trying these in order:
- An OIDC token file. If
AWS_WEB_IDENTITY_TOKEN_FILEpoints to a file with an OIDC token, the CLI exchanges it for the role's credentials. This is the same variable the AWS CLI and SDKs use, so it works with any CI tool that issues OIDC tokens. - GitHub Actions. If the job has the
id-token: writepermission, the CLI requests the job's OIDC token from GitHub. Nothing to configure in the workflow. - Ambient AWS credentials. Otherwise the CLI uses whatever credentials the runner already has (an EC2 instance profile, an EKS pod identity, or AWS keys in the environment).
In every case, the role's trust policy has to allow the identity the runner presents. The steps below show what that means for each tool.
1. Configure the role in the provider
- Create an IAM role in the AWS account that owns the registry. Give it
ecr:GetAuthorizationTokenplus push permissions on your repositories (ecr:BatchCheckLayerAvailability,ecr:InitiateLayerUpload,ecr:UploadLayerPart,ecr:CompleteLayerUpload,ecr:PutImage,ecr:BatchGetImage). If you push Lambda functions, adds3:PutObjecton the assets bucket. - Set its trust policy according to your CI tool (see below).
- In nullplatform, go to Platform settings > Asset repository, open your ECR configuration, and set Role ARN under CI/CD Image Push Configuration. You can leave the existing Access Key and Secret Key in place for now.
💡 Tip: If you manage the provider with OpenTofu, the
nullplatform/asset/ecrmodule exposes the same setting as thebuild_workflow_role_arnvariable.
2. Set up your CI tool
GitHub Actions
Give the job the id-token: write permission. The CLI takes care of the rest:
name: CI/CD pipeline nullplatform
env:
  NULLPLATFORM_API_KEY: ${{ secrets.NULLPLATFORM_API_KEY }}
on:
  push:
    branches:
      - main
permissions:
  id-token: write
  contents: read

jobs:
  build:
    runs-on: ubuntu-latest
    steps:
      - name: Install nullplatform CLI
        run: curl https://cli.nullplatform.com/install.sh | sh
      - name: Check out code
        uses: actions/checkout@v4
      - name: Create build on nullplatform
        run: np build start
      - name: Build Docker image
        run: docker build -t my-app .
      - name: Push Docker image
        run: np asset push --type docker-image --source my-app
      - name: Set the build as successful or failed
        if: ${{ always() }}
        run: np build update --status ${{ contains(fromJSON('["failure", "cancelled"]'), job.status) && 'failed' || 'successful' }}
Trust policy: allow the GitHub OIDC provider (token.actions.githubusercontent.com) with the audience sts.amazonaws.com, and restrict the sub claim to your organization or repositories. It's the same trust policy aws-actions/configure-aws-credentials uses, so you can reuse an existing role.
GitLab CI
Request an ID token with the sts.amazonaws.com audience, write it to a file, and point AWS_WEB_IDENTITY_TOKEN_FILE at it before running the CLI:
build-finalize:
  stage: build
  id_tokens:
    AWS_ID_TOKEN:
      aud: sts.amazonaws.com
  before_script:
    - apk add curl crane
    - curl https://cli.nullplatform.com/install.sh | sh
    - echo "$AWS_ID_TOKEN" > /tmp/aws-web-identity-token
    - export AWS_WEB_IDENTITY_TOKEN_FILE=/tmp/aws-web-identity-token
  script:
    - np asset push --type docker-image --source image.tar
    - np build update --status successful
Trust policy: allow the GitLab OIDC provider (https://gitlab.com, or your self-managed instance's URL) with the audience sts.amazonaws.com, and restrict the sub claim to your project or branch.
Other CI tools with OIDC
Any tool that issues an OIDC token works like GitLab: write the token to a file and export AWS_WEB_IDENTITY_TOKEN_FILE. For example, Bitbucket Pipelines exposes the token as BITBUCKET_STEP_OIDC_TOKEN when the step has oidc: true, and CircleCI as CIRCLE_OIDC_TOKEN_V2:
echo "$BITBUCKET_STEP_OIDC_TOKEN" > /tmp/aws-web-identity-token
export AWS_WEB_IDENTITY_TOKEN_FILE=/tmp/aws-web-identity-token
np asset push --type docker-image --source image.tar
Trust policy: allow that tool's OIDC provider with the audience it uses for the token.
💡 Tip: Don't set
AWS_ROLE_ARNnext toAWS_WEB_IDENTITY_TOKEN_FILE. The CLI already knows which role to assume from the provider. If both are set, it treats them as the runner's own identity (for example, an EKS pod identity) and uses those credentials to assume the provider role.
Runners that already have AWS credentials
If the runner already has AWS credentials (an EC2 instance profile, an EKS pod identity, or a Jenkins agent with AWS keys in its environment), there's nothing to add to the pipeline. The role's trust policy has to allow that principal.
Runners without OIDC or AWS credentials
Keep using the provider's access keys and don't configure a role. Other pipelines in the organization can still move to the role. If you'd rather not store keys in the provider, pass --aws-role-arn together with --aws-access-key-id and --aws-secret-access-key to assume the role with a dedicated user's keys.
3. Remove the keys
Once your pipelines push successfully with the role, remove Access Key and Secret Key from the provider and retire the IAM user. Nothing changes in the pipelines: the CLI was already ignoring the keys.
If your workflow used to obtain AWS credentials on its own, you can also drop those steps (such as aws-actions/configure-aws-credentials and aws-actions/amazon-ecr-login) and the --no-login flag from np asset push. Make sure the CLI is up to date on your runners: the install script always installs the latest version.
Logging in from the pipeline
If you'd rather keep registry access under your pipeline's control, log in with your own tooling and pass --no-login. The CLI then skips credential resolution entirely: it doesn't read the provider's credentials, call AWS, or run docker login. It just tags and pushes the image with the session your pipeline opened, and registers the asset in the build.
--no-login applies to Docker images only. Lambda uploads to S3 always use the AWS credentials described above.
This works with any registry and any CI tool. For example, with a plain docker login:
- name: Log in to the registry
  run: echo "${{ secrets.REGISTRY_PASSWORD }}" | docker login myregistry.azurecr.io -u "${{ secrets.REGISTRY_USERNAME }}" --password-stdin
- name: Push Docker image
  run: np asset push --type docker-image --source my-app --no-login
Or with the AWS actions for ECR:
- name: Configure AWS credentials
  uses: aws-actions/configure-aws-credentials@v4
  with:
    role-to-assume: arn:aws:iam::123456789012:role/ci-image-pusher
    aws-region: us-east-1
- name: Log in to Amazon ECR
  uses: aws-actions/amazon-ecr-login@v2
- name: Push Docker image
  run: np asset push --type docker-image --source my-app --no-login
The trade-off is that every pipeline owns its registry credentials and the steps to obtain them, instead of a single place in nullplatform.