---
sidebar_label: Channels
doc_id: 38a23ce8-f999-42cf-970f-aead920d0ee9
description: >-
Configure notification channels to route events to Slack, webhooks, GitHub,
GitLab, Azure, or agents for alerts and approvals.
keywords:
- notifications
- Slack
- webhooks
- GitHub
- GitLab
---
import Tabs from '@theme/Tabs';
import TabItem from '@theme/TabItem';
# Channels
Channels define **where** notifications are delivered. Configure them via the UI, CLI, or API to route events to:
- **Slack**: receive messages in specific channels for approvals or alerts
- **HTTP Webhooks**: process events programmatically with custom logic (e.g., auto-approve deployments during business hours)
- **GitHub**, **GitLab**, and **Azure**: trigger CI/CD workflows as part of your service provisioning process
- **Agent**: execute commands inside your own infrastructure
Each channel listens to one or more **sources** that determine which events it receives. See [Sources & actions](/docs/notifications/sources-and-actions) for the full reference of available sources and actions.
:::info
This page covers channel creation. To list, update, or delete existing channels, see [Manage channels](/docs/notifications/manage-channels).
:::
:::tip Create channels from the UI
Go to **Platform settings > Notifications > Channels** and click **+ New channel**.
:::
## Slack
To receive notifications on Slack, you'll need to:
1. **Install nullplatform's Slack application**
Go to `https://.app.nullplatform.io/integration`
and click **Connect Slack** to authorize the application.
2. **In Slack, invite the nullplatform application to the channels where you want to receive notifications**
You can
do this with the slash command `/invite @nullplatform`.
3. **Set notification channels for your teams, applications, etc.**
To create a notification channel for Slack,
you can use the UI, the [nullplatform CLI](/docs/cli/), or send a
[POST request to create a channel](/docs/api/notification-channel-create).
:::tip
If multiple teams need notifications (e.g., different approvers per team), create a separate notification channel for
each team by specifying the corresponding NRN.
:::
**Example request:**
The easiest way to create a Slack notification channel is through the UI.
1. Go to **Platform settings → Notifications → Channels**.
2. Click **+ New channel**.
3. Fill in the required fields:
- **Description**: A human-readable description to help you identify the channel, for example:
*My Slack channel for approval notifications*
- **Source**: The entity whose activity you want to listen to, for example: *approval*
- **Channel** type: Select *Slack*, then enter the Slack channel name, for example: *my-organization-private-channel*
- **Resource** (NRN): Select the resource that will trigger the notifications.
- **Filters**: Define which events should generate notifications by filtering the incoming data, for example: *action equals deployment:create*
4. Click **Create channel** to create the notification channel.
```bash
curl -L -X POST 'https://api.nullplatform.com/notification/channel' \
-H 'Content-Type: application/json' \
-H 'Accept: application/json' \
-H 'Authorization: Bearer ' \
-d '{
"nrn": "organization=1:account=2:namespace=3:application=4", // The NRN of the resource where the action will apply.
"description": "My Slack channel for approval notifications",
"source": [
"approval"
],
"type": "slack",
"configuration": {
"channels": [
"my-organization-private-channel"
]
},
"filters": {
"action": "deployment:create"
}
}'
```
This endpoint returns an ID that you can later use to reconfigure or delete the notification channel using `PATCH` or `DELETE`
requests.
```bash
np notification channel create \
--body '{
"nrn": "organization=1:account=2:namespace=3:application=4", // The NRN of the resource where the action will apply.
"description": "My Slack channel for approval notifications",
"source": [
"approval"
],
"type": "slack",
"configuration": {
"channels": [
"my-organization-private-channel"
]
},
"filters": {
"action": "deployment:create"
}
}'
```
This endpoint returns an ID that you can later use to reconfigure or delete the notification channel using `PATCH` or `DELETE`
requests.
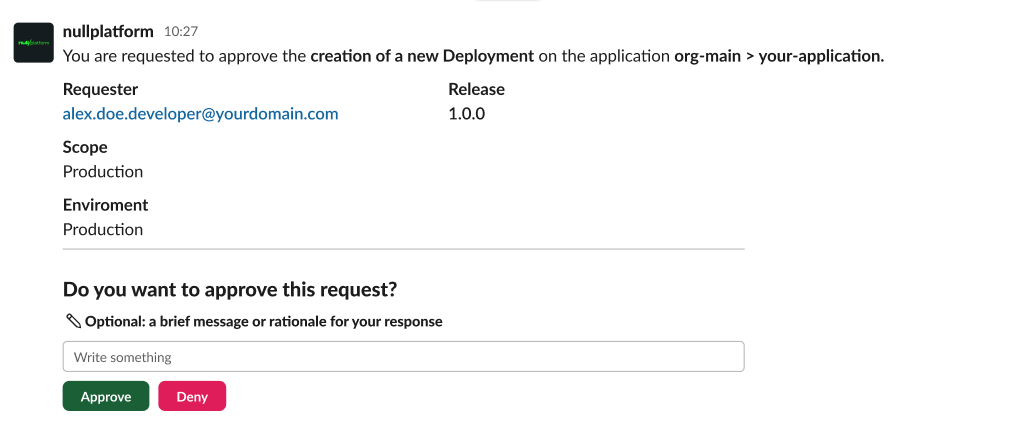
Once configured, you’ll receive Slack messages to approve or deny requests.
Here's an example:
 ## Agent
Agent notification channels let you trigger actions inside your infrastructure in response to platform events. When an event matches the channel's source and filters, nullplatform sends the notification to the [nullplatform agent](/docs/agent/overview), which executes a command on your machine.
### Prerequisites
- The nullplatform agent [installed](/docs/agent/installation) and connected
- An API key with **Agent** and **Ops** roles. See [Authenticate the agent](/docs/agent/authentication)
### Configuration fields
The `configuration` object for an agent channel has three parts:
| Field | Required | Description |
|-------|----------|-------------|
| `api_key` | Yes | An API key with the **Agent** and **Ops** roles. The agent uses this key to authenticate with nullplatform. Create one in **Platform settings > API keys**. See [Authenticate the agent](/docs/agent/authentication) |
| `command` | Yes | The command the agent executes when a notification arrives. See details below |
| `selector` | No | Key-value tags used to route the notification to the right agent instance. The tags must match the agent's `AGENT_TAGS`. For example, `{ "environment": "production" }` routes only to agents tagged with `environment=production` |
#### The `command` object
| Field | Required | Description |
|-------|----------|-------------|
| `command.type` | Yes | The execution type. Currently only `exec` is supported |
| `command.data.cmdline` | Yes | The command line to execute. The path must point to a valid executable on the agent's machine (e.g., `/root/.np/nullplatform/scopes/entrypoint`). You can include flags like `--service-path="$SERVICE_PATH"` or `--overrides-path=/path/to/your/repo` |
| `command.data.environment` | No | Environment variables passed to the command. Use `${NOTIFICATION_CONTEXT}` to inject the full notification payload as a JSON string |
| `command.data.arguments` | No | An array of additional arguments passed to the command |
:::tip
The `${NOTIFICATION_CONTEXT}` variable is key for agent channels. It contains the full notification payload as a JSON string, which your script can parse to determine what action to take. Assign it to an environment variable like `NP_ACTION_CONTEXT` so your entrypoint can read it.
:::
### Example request
1. Go to **Platform settings > Notifications > Channels**.
2. Click **+ New channel**.
3. Fill in the required fields:
- **Description**: a human-readable name, for example: *Agent channel for service provisioning*
- **Source**: the event source, for example: *service* and *telemetry*
- **Channel** type: select *Agent*
- **API key**: paste the API key you created for the agent
- **Command**: set the command type to *exec*, enter the command line path, and add environment variables (e.g., `NP_ACTION_CONTEXT` = `${NOTIFICATION_CONTEXT}`)
- **Selector**: enter the key-value tags that match your agent's `AGENT_TAGS` (e.g., `environment` = `local`)
- **Resource** (NRN): select the resource that will trigger the notifications
- **Filters**: optionally filter which events trigger the command
4. Click **Create channel**.
```bash
np notification channel create \
--body '{
"nrn": "organization=1:account=2:namespace=3:application=4",
"description": "Agent channel for service provisioning",
"type": "agent",
"source": ["service", "telemetry"],
"configuration": {
"api_key": "AAAA.1234567890abcdef1234567890abcdefPTs=",
"command": {
"type": "exec",
"data": {
"cmdline": "/root/.np/nullplatform/scopes/entrypoint --service-path=\"$SERVICE_PATH\"",
"environment": {
"NP_ACTION_CONTEXT": "${NOTIFICATION_CONTEXT}"
}
}
},
"selector": {
"environment": "local"
}
},
"filters": {
"service.specification.slug": "my-service-spec"
}
}'
```
```bash
curl -L -X POST 'https://api.nullplatform.com/notification/channel' \
-H 'Content-Type: application/json' \
-H 'Accept: application/json' \
-H 'Authorization: Bearer ' \
-d '{
"nrn": "organization=1:account=2:namespace=3:application=4",
"description": "Agent channel for service provisioning",
"type": "agent",
"source": ["service", "telemetry"],
"configuration": {
"api_key": "AAAA.1234567890abcdef1234567890abcdefPTs=",
"command": {
"type": "exec",
"data": {
"cmdline": "/root/.np/nullplatform/scopes/entrypoint --service-path=\"$SERVICE_PATH\"",
"environment": {
"NP_ACTION_CONTEXT": "${NOTIFICATION_CONTEXT}"
}
}
},
"selector": {
"environment": "local"
}
},
"filters": {
"service.specification.slug": "my-service-spec"
}
}'
```
:::info
For a detailed guide on using agent channels with scopes and custom overrides, see [Set up an agent notification channel](/docs/agent/agent-channel) and [Override environment setup](/docs/agent-backed-scopes/overrides/setup).
:::
## HTTP webhook
HTTP webhooks let external systems receive and process notification events programmatically. Use them to implement custom logic, such as _"approve this deployment only if it's business hours and the card is marked as verified by QA"_.
Configure nullplatform to send POST requests to your custom endpoint using either [our API](/docs/api/notification-channel-create) or the [CLI](/docs/cli/).
:::note Authorization
Embed any token or secret directly in the URL or headers. We currently do not support a refresh token scheme.
:::
The easiest way to create an HTTP notification channel is through the UI.
1. Go to **Platform settings → Notifications → Channels**.
2. Click **+ New channel**.
3. Fill in the required fields:
- **Description**: A human-readable description to help you identify the channel, for example:
*My HTTP channel for approval notifications*
- **Source**: The entity whose activity you want to listen to, for example: *telemetry* and *service*.
- **Channel** type: Select *HTTP*, and enter the configuration URL and headers.
- **Resource** (NRN): Select the resource that will trigger the notifications.
- **Filters**: Define which events should generate notifications by filtering the incoming data.
4. Click **Create channel** to create the notification channel.
```bash
curl -X POST "https://api.nullplatform.com/notification/channel" \
-H "Content-Type: application/json" \
-H "Accept: application/json" \
-d '{
"source": ["approval"],
"description": "My HTTP channel for approval notifications",
"nrn": "organization=1:account=2:namespace=3:application=4",
"type": "http",
"configuration": {
"url": "https://yourdomain.com/your-configured-endpoint",
"headers": {
"Authorization": "Bearer the-token"
}
}
}'
```
```bash
np notification channel create \
--body '{
"source": ["approval"],
"nrn": "organization=1:account=2:namespace=3:application=4",
"description": "My HTTP channel for approval notifications",
"type": "http",
"configuration": {
"url": "https://yourdomain.com/your-configured-endpoint",
"headers": {
"Authorization": "Bearer the-token"
}
}
}'
```
:::warning Endpoint response time
Your endpoint must respond within **10 seconds**. If it doesn't, the delivery is marked as failed and retried up to **5 times** with exponential backoff.
This means a single event can appear multiple times in your notification history. To handle duplicates, use the `message_id` field in the payload, which stays the same across all retry attempts for the same event.
:::
After setting up your custom notification channel, you'll start receiving POST requests to your endpoint. The payload structure varies by source:
```json title="approval — POST https://yourdomain.com/url-you-configured"
{
"id": 123,
"source": "approval",
"created_at": "2022-12-19T20:37:42.109Z",
"notification": {
"approval_id": 1234,
"approve_url": "https://api.nullplatform.com/approval/1234/approve?token=the-token",
"deny_url": "https://api.nullplatform.com/approval/1234/deny?token=the-token",
"requested_by": {
"user_id": 1,
"email": "alex.doe.developer@yourdomain.com",
"first_name": "alex",
"last_name": "doe",
"avatar": null
},
"action": "deployment:create",
"details": {...}
}
}
```
```json title="audit — POST https://yourdomain.com/url-you-configured"
{
"entity_context": {
"organization_id": 1,
"account_id": 2,
"namespace_id": 3,
"application_name": "Acme Test App",
"application_slug": "acme-test-app"
},
"user_email": "alex.doe.developer@domain.com",
"user_type": "person",
"entity": "application",
"entity_id": "4",
"method": "PATCH",
"status": 204,
"url": "/application/4",
"entity_data": { ... },
"request_body": { "name": "Acme Test App" },
"date": "2025-05-18T08:47:19.984Z",
"messageId": "abc-7d2fe831-a3b9-495c-9f17-3a8a123bfc6c"
}
```
:::tip
The `messageId` field is stable across retry attempts — use it to deduplicate events if your endpoint fails to respond within the 10-second window and nullplatform retries the delivery.
:::
## GitHub
GitHub channels trigger GitHub Actions workflows in response to platform events. They're typically used with the `service` source to run provisioning pipelines when service actions are created.
:::note Prerequisites
You need a GitHub App installation configured for your organization. See [GitHub configuration](/docs/providers/supported-integrations/code-repository/github-configuration) for setup instructions.
:::
1. Go to **Platform settings > Notifications > Channels**.
2. Click **+ New channel**.
3. Fill in the required fields:
- **Description**: A human-readable description, for example: *GitHub workflow for service provisioning*
- **Source**: The event source, for example: *service*
- **Channel** type: Select *GitHub*, then fill in the GitHub configuration fields.
- **Resource** (NRN): Select the resource that will trigger the notifications.
- **Filters**: Optionally filter which events trigger the workflow.
4. Click **Create channel**.
```bash
np notification channel create \
--body '{
"nrn": "organization=1:account=2:namespace=3:application=4",
"description": "GitHub workflow for service provisioning",
"source": ["service"],
"type": "github",
"configuration": {
"installation_id": "12345678",
"account": "my-github-org",
"repository": "services-opentofu",
"reference": "main",
"workflow_id": "provisioning.yml"
},
"filters": {
"service.specification.slug": "my-service-spec"
}
}'
```
```bash
curl -L -X POST 'https://api.nullplatform.com/notification/channel' \
-H 'Content-Type: application/json' \
-H 'Accept: application/json' \
-H 'Authorization: Bearer ' \
-d '{
"nrn": "organization=1:account=2:namespace=3:application=4",
"description": "GitHub workflow for service provisioning",
"source": ["service"],
"type": "github",
"configuration": {
"installation_id": "12345678",
"account": "my-github-org",
"repository": "services-opentofu",
"reference": "main",
"workflow_id": "provisioning.yml"
},
"filters": {
"service.specification.slug": "my-service-spec"
}
}'
```
**Configuration fields:**
| Field | Description |
|-------|------------|
| `installation_id` | The GitHub App installation ID for your organization |
| `account` | The GitHub organization or user account that owns the repository |
| `repository` | The repository containing the workflow file |
| `reference` | The git branch to use (e.g., `main`) |
| `workflow_id` | The workflow file name (e.g., `provisioning.yml`) |
## GitLab
GitLab channels trigger CI/CD pipelines in response to platform events. Like GitHub channels, they're commonly used with the `service` source for provisioning workflows.
:::note Prerequisites
You need a GitLab integration configured for your organization. See [GitLab configuration](/docs/providers/supported-integrations/code-repository/gitlab-configuration) for setup instructions.
:::
1. Go to **Platform settings > Notifications > Channels**.
2. Click **+ New channel**.
3. Fill in the required fields:
- **Description**: A human-readable description, for example: *GitLab pipeline for service provisioning*
- **Source**: The event source, for example: *service*
- **Channel** type: Select *GitLab*, then enter the project ID and reference branch.
- **Resource** (NRN): Select the resource that will trigger the notifications.
- **Filters**: Optionally filter which events trigger the pipeline.
4. Click **Create channel**.
```bash
np notification channel create \
--body '{
"nrn": "organization=1:account=2:namespace=3:application=4",
"description": "GitLab pipeline for service provisioning",
"source": ["service"],
"type": "gitlab",
"configuration": {
"project_id": "1234",
"reference": "main"
},
"filters": {
"service.specification.slug": "my-service-spec"
}
}'
```
```bash
curl -L -X POST 'https://api.nullplatform.com/notification/channel' \
-H 'Content-Type: application/json' \
-H 'Accept: application/json' \
-H 'Authorization: Bearer ' \
-d '{
"nrn": "organization=1:account=2:namespace=3:application=4",
"description": "GitLab pipeline for service provisioning",
"source": ["service"],
"type": "gitlab",
"configuration": {
"project_id": "1234",
"reference": "main"
},
"filters": {
"service.specification.slug": "my-service-spec"
}
}'
```
**Configuration fields:**
| Field | Description |
|-------|------------|
| `project_id` | The GitLab project ID |
| `reference` | The git branch to use (e.g., `main`) |
## Azure DevOps
Azure DevOps channels trigger Azure Pipelines in response to platform events. They're used with the `service` source for provisioning workflows.
:::note Prerequisites
You need an Azure DevOps integration configured for your organization. See [Azure DevOps configuration](/docs/providers/supported-integrations/code-repository/azure-devops-configuration) for setup instructions.
:::
1. Go to **Platform settings > Notifications > Channels**.
2. Click **+ New channel**.
3. Fill in the required fields:
- **Description**: A human-readable description, for example: *Azure pipeline for service provisioning*
- **Source**: The event source, for example: *service*
- **Channel** type: Select *Azure*, then enter the organization, project, pipeline ID, and reference branch.
- **Resource** (NRN): Select the resource that will trigger the notifications.
- **Filters**: Optionally filter which events trigger the pipeline.
4. Click **Create channel**.
```bash
np notification channel create \
--body '{
"nrn": "organization=1:account=2:namespace=3:application=4",
"description": "Azure pipeline for service provisioning",
"source": ["service"],
"type": "azure",
"configuration": {
"organization": "my-azure-org",
"project": "my-azure-project",
"pipeline_id": 1234,
"reference": "main"
},
"filters": {
"service.specification.slug": "my-service-spec"
}
}'
```
```bash
curl -L -X POST 'https://api.nullplatform.com/notification/channel' \
-H 'Content-Type: application/json' \
-H 'Accept: application/json' \
-H 'Authorization: Bearer ' \
-d '{
"nrn": "organization=1:account=2:namespace=3:application=4",
"description": "Azure pipeline for service provisioning",
"source": ["service"],
"type": "azure",
"configuration": {
"organization": "my-azure-org",
"project": "my-azure-project",
"pipeline_id": 1234,
"reference": "main"
},
"filters": {
"service.specification.slug": "my-service-spec"
}
}'
```
**Configuration fields:**
| Field | Description |
|-------|------------|
| `organization` | Your Azure DevOps organization name |
| `project` | The Azure DevOps project name |
| `pipeline_id` | The ID of the Azure Pipeline to trigger |
| `reference` | The git branch to use (e.g., `main`) |
## Next steps
- [Sources and actions](/docs/notifications/sources-and-actions) — understand which sources and actions are available for each channel type
- [Apply filters to route specific events](/docs/notifications/filters)
- [Manage existing channels](/docs/notifications/manage-channels)
- [Inspect event payloads](/docs/notifications/event-payloads)
## Agent
Agent notification channels let you trigger actions inside your infrastructure in response to platform events. When an event matches the channel's source and filters, nullplatform sends the notification to the [nullplatform agent](/docs/agent/overview), which executes a command on your machine.
### Prerequisites
- The nullplatform agent [installed](/docs/agent/installation) and connected
- An API key with **Agent** and **Ops** roles. See [Authenticate the agent](/docs/agent/authentication)
### Configuration fields
The `configuration` object for an agent channel has three parts:
| Field | Required | Description |
|-------|----------|-------------|
| `api_key` | Yes | An API key with the **Agent** and **Ops** roles. The agent uses this key to authenticate with nullplatform. Create one in **Platform settings > API keys**. See [Authenticate the agent](/docs/agent/authentication) |
| `command` | Yes | The command the agent executes when a notification arrives. See details below |
| `selector` | No | Key-value tags used to route the notification to the right agent instance. The tags must match the agent's `AGENT_TAGS`. For example, `{ "environment": "production" }` routes only to agents tagged with `environment=production` |
#### The `command` object
| Field | Required | Description |
|-------|----------|-------------|
| `command.type` | Yes | The execution type. Currently only `exec` is supported |
| `command.data.cmdline` | Yes | The command line to execute. The path must point to a valid executable on the agent's machine (e.g., `/root/.np/nullplatform/scopes/entrypoint`). You can include flags like `--service-path="$SERVICE_PATH"` or `--overrides-path=/path/to/your/repo` |
| `command.data.environment` | No | Environment variables passed to the command. Use `${NOTIFICATION_CONTEXT}` to inject the full notification payload as a JSON string |
| `command.data.arguments` | No | An array of additional arguments passed to the command |
:::tip
The `${NOTIFICATION_CONTEXT}` variable is key for agent channels. It contains the full notification payload as a JSON string, which your script can parse to determine what action to take. Assign it to an environment variable like `NP_ACTION_CONTEXT` so your entrypoint can read it.
:::
### Example request
1. Go to **Platform settings > Notifications > Channels**.
2. Click **+ New channel**.
3. Fill in the required fields:
- **Description**: a human-readable name, for example: *Agent channel for service provisioning*
- **Source**: the event source, for example: *service* and *telemetry*
- **Channel** type: select *Agent*
- **API key**: paste the API key you created for the agent
- **Command**: set the command type to *exec*, enter the command line path, and add environment variables (e.g., `NP_ACTION_CONTEXT` = `${NOTIFICATION_CONTEXT}`)
- **Selector**: enter the key-value tags that match your agent's `AGENT_TAGS` (e.g., `environment` = `local`)
- **Resource** (NRN): select the resource that will trigger the notifications
- **Filters**: optionally filter which events trigger the command
4. Click **Create channel**.
```bash
np notification channel create \
--body '{
"nrn": "organization=1:account=2:namespace=3:application=4",
"description": "Agent channel for service provisioning",
"type": "agent",
"source": ["service", "telemetry"],
"configuration": {
"api_key": "AAAA.1234567890abcdef1234567890abcdefPTs=",
"command": {
"type": "exec",
"data": {
"cmdline": "/root/.np/nullplatform/scopes/entrypoint --service-path=\"$SERVICE_PATH\"",
"environment": {
"NP_ACTION_CONTEXT": "${NOTIFICATION_CONTEXT}"
}
}
},
"selector": {
"environment": "local"
}
},
"filters": {
"service.specification.slug": "my-service-spec"
}
}'
```
```bash
curl -L -X POST 'https://api.nullplatform.com/notification/channel' \
-H 'Content-Type: application/json' \
-H 'Accept: application/json' \
-H 'Authorization: Bearer ' \
-d '{
"nrn": "organization=1:account=2:namespace=3:application=4",
"description": "Agent channel for service provisioning",
"type": "agent",
"source": ["service", "telemetry"],
"configuration": {
"api_key": "AAAA.1234567890abcdef1234567890abcdefPTs=",
"command": {
"type": "exec",
"data": {
"cmdline": "/root/.np/nullplatform/scopes/entrypoint --service-path=\"$SERVICE_PATH\"",
"environment": {
"NP_ACTION_CONTEXT": "${NOTIFICATION_CONTEXT}"
}
}
},
"selector": {
"environment": "local"
}
},
"filters": {
"service.specification.slug": "my-service-spec"
}
}'
```
:::info
For a detailed guide on using agent channels with scopes and custom overrides, see [Set up an agent notification channel](/docs/agent/agent-channel) and [Override environment setup](/docs/agent-backed-scopes/overrides/setup).
:::
## HTTP webhook
HTTP webhooks let external systems receive and process notification events programmatically. Use them to implement custom logic, such as _"approve this deployment only if it's business hours and the card is marked as verified by QA"_.
Configure nullplatform to send POST requests to your custom endpoint using either [our API](/docs/api/notification-channel-create) or the [CLI](/docs/cli/).
:::note Authorization
Embed any token or secret directly in the URL or headers. We currently do not support a refresh token scheme.
:::
The easiest way to create an HTTP notification channel is through the UI.
1. Go to **Platform settings → Notifications → Channels**.
2. Click **+ New channel**.
3. Fill in the required fields:
- **Description**: A human-readable description to help you identify the channel, for example:
*My HTTP channel for approval notifications*
- **Source**: The entity whose activity you want to listen to, for example: *telemetry* and *service*.
- **Channel** type: Select *HTTP*, and enter the configuration URL and headers.
- **Resource** (NRN): Select the resource that will trigger the notifications.
- **Filters**: Define which events should generate notifications by filtering the incoming data.
4. Click **Create channel** to create the notification channel.
```bash
curl -X POST "https://api.nullplatform.com/notification/channel" \
-H "Content-Type: application/json" \
-H "Accept: application/json" \
-d '{
"source": ["approval"],
"description": "My HTTP channel for approval notifications",
"nrn": "organization=1:account=2:namespace=3:application=4",
"type": "http",
"configuration": {
"url": "https://yourdomain.com/your-configured-endpoint",
"headers": {
"Authorization": "Bearer the-token"
}
}
}'
```
```bash
np notification channel create \
--body '{
"source": ["approval"],
"nrn": "organization=1:account=2:namespace=3:application=4",
"description": "My HTTP channel for approval notifications",
"type": "http",
"configuration": {
"url": "https://yourdomain.com/your-configured-endpoint",
"headers": {
"Authorization": "Bearer the-token"
}
}
}'
```
:::warning Endpoint response time
Your endpoint must respond within **10 seconds**. If it doesn't, the delivery is marked as failed and retried up to **5 times** with exponential backoff.
This means a single event can appear multiple times in your notification history. To handle duplicates, use the `message_id` field in the payload, which stays the same across all retry attempts for the same event.
:::
After setting up your custom notification channel, you'll start receiving POST requests to your endpoint. The payload structure varies by source:
```json title="approval — POST https://yourdomain.com/url-you-configured"
{
"id": 123,
"source": "approval",
"created_at": "2022-12-19T20:37:42.109Z",
"notification": {
"approval_id": 1234,
"approve_url": "https://api.nullplatform.com/approval/1234/approve?token=the-token",
"deny_url": "https://api.nullplatform.com/approval/1234/deny?token=the-token",
"requested_by": {
"user_id": 1,
"email": "alex.doe.developer@yourdomain.com",
"first_name": "alex",
"last_name": "doe",
"avatar": null
},
"action": "deployment:create",
"details": {...}
}
}
```
```json title="audit — POST https://yourdomain.com/url-you-configured"
{
"entity_context": {
"organization_id": 1,
"account_id": 2,
"namespace_id": 3,
"application_name": "Acme Test App",
"application_slug": "acme-test-app"
},
"user_email": "alex.doe.developer@domain.com",
"user_type": "person",
"entity": "application",
"entity_id": "4",
"method": "PATCH",
"status": 204,
"url": "/application/4",
"entity_data": { ... },
"request_body": { "name": "Acme Test App" },
"date": "2025-05-18T08:47:19.984Z",
"messageId": "abc-7d2fe831-a3b9-495c-9f17-3a8a123bfc6c"
}
```
:::tip
The `messageId` field is stable across retry attempts — use it to deduplicate events if your endpoint fails to respond within the 10-second window and nullplatform retries the delivery.
:::
## GitHub
GitHub channels trigger GitHub Actions workflows in response to platform events. They're typically used with the `service` source to run provisioning pipelines when service actions are created.
:::note Prerequisites
You need a GitHub App installation configured for your organization. See [GitHub configuration](/docs/providers/supported-integrations/code-repository/github-configuration) for setup instructions.
:::
1. Go to **Platform settings > Notifications > Channels**.
2. Click **+ New channel**.
3. Fill in the required fields:
- **Description**: A human-readable description, for example: *GitHub workflow for service provisioning*
- **Source**: The event source, for example: *service*
- **Channel** type: Select *GitHub*, then fill in the GitHub configuration fields.
- **Resource** (NRN): Select the resource that will trigger the notifications.
- **Filters**: Optionally filter which events trigger the workflow.
4. Click **Create channel**.
```bash
np notification channel create \
--body '{
"nrn": "organization=1:account=2:namespace=3:application=4",
"description": "GitHub workflow for service provisioning",
"source": ["service"],
"type": "github",
"configuration": {
"installation_id": "12345678",
"account": "my-github-org",
"repository": "services-opentofu",
"reference": "main",
"workflow_id": "provisioning.yml"
},
"filters": {
"service.specification.slug": "my-service-spec"
}
}'
```
```bash
curl -L -X POST 'https://api.nullplatform.com/notification/channel' \
-H 'Content-Type: application/json' \
-H 'Accept: application/json' \
-H 'Authorization: Bearer ' \
-d '{
"nrn": "organization=1:account=2:namespace=3:application=4",
"description": "GitHub workflow for service provisioning",
"source": ["service"],
"type": "github",
"configuration": {
"installation_id": "12345678",
"account": "my-github-org",
"repository": "services-opentofu",
"reference": "main",
"workflow_id": "provisioning.yml"
},
"filters": {
"service.specification.slug": "my-service-spec"
}
}'
```
**Configuration fields:**
| Field | Description |
|-------|------------|
| `installation_id` | The GitHub App installation ID for your organization |
| `account` | The GitHub organization or user account that owns the repository |
| `repository` | The repository containing the workflow file |
| `reference` | The git branch to use (e.g., `main`) |
| `workflow_id` | The workflow file name (e.g., `provisioning.yml`) |
## GitLab
GitLab channels trigger CI/CD pipelines in response to platform events. Like GitHub channels, they're commonly used with the `service` source for provisioning workflows.
:::note Prerequisites
You need a GitLab integration configured for your organization. See [GitLab configuration](/docs/providers/supported-integrations/code-repository/gitlab-configuration) for setup instructions.
:::
1. Go to **Platform settings > Notifications > Channels**.
2. Click **+ New channel**.
3. Fill in the required fields:
- **Description**: A human-readable description, for example: *GitLab pipeline for service provisioning*
- **Source**: The event source, for example: *service*
- **Channel** type: Select *GitLab*, then enter the project ID and reference branch.
- **Resource** (NRN): Select the resource that will trigger the notifications.
- **Filters**: Optionally filter which events trigger the pipeline.
4. Click **Create channel**.
```bash
np notification channel create \
--body '{
"nrn": "organization=1:account=2:namespace=3:application=4",
"description": "GitLab pipeline for service provisioning",
"source": ["service"],
"type": "gitlab",
"configuration": {
"project_id": "1234",
"reference": "main"
},
"filters": {
"service.specification.slug": "my-service-spec"
}
}'
```
```bash
curl -L -X POST 'https://api.nullplatform.com/notification/channel' \
-H 'Content-Type: application/json' \
-H 'Accept: application/json' \
-H 'Authorization: Bearer ' \
-d '{
"nrn": "organization=1:account=2:namespace=3:application=4",
"description": "GitLab pipeline for service provisioning",
"source": ["service"],
"type": "gitlab",
"configuration": {
"project_id": "1234",
"reference": "main"
},
"filters": {
"service.specification.slug": "my-service-spec"
}
}'
```
**Configuration fields:**
| Field | Description |
|-------|------------|
| `project_id` | The GitLab project ID |
| `reference` | The git branch to use (e.g., `main`) |
## Azure DevOps
Azure DevOps channels trigger Azure Pipelines in response to platform events. They're used with the `service` source for provisioning workflows.
:::note Prerequisites
You need an Azure DevOps integration configured for your organization. See [Azure DevOps configuration](/docs/providers/supported-integrations/code-repository/azure-devops-configuration) for setup instructions.
:::
1. Go to **Platform settings > Notifications > Channels**.
2. Click **+ New channel**.
3. Fill in the required fields:
- **Description**: A human-readable description, for example: *Azure pipeline for service provisioning*
- **Source**: The event source, for example: *service*
- **Channel** type: Select *Azure*, then enter the organization, project, pipeline ID, and reference branch.
- **Resource** (NRN): Select the resource that will trigger the notifications.
- **Filters**: Optionally filter which events trigger the pipeline.
4. Click **Create channel**.
```bash
np notification channel create \
--body '{
"nrn": "organization=1:account=2:namespace=3:application=4",
"description": "Azure pipeline for service provisioning",
"source": ["service"],
"type": "azure",
"configuration": {
"organization": "my-azure-org",
"project": "my-azure-project",
"pipeline_id": 1234,
"reference": "main"
},
"filters": {
"service.specification.slug": "my-service-spec"
}
}'
```
```bash
curl -L -X POST 'https://api.nullplatform.com/notification/channel' \
-H 'Content-Type: application/json' \
-H 'Accept: application/json' \
-H 'Authorization: Bearer ' \
-d '{
"nrn": "organization=1:account=2:namespace=3:application=4",
"description": "Azure pipeline for service provisioning",
"source": ["service"],
"type": "azure",
"configuration": {
"organization": "my-azure-org",
"project": "my-azure-project",
"pipeline_id": 1234,
"reference": "main"
},
"filters": {
"service.specification.slug": "my-service-spec"
}
}'
```
**Configuration fields:**
| Field | Description |
|-------|------------|
| `organization` | Your Azure DevOps organization name |
| `project` | The Azure DevOps project name |
| `pipeline_id` | The ID of the Azure Pipeline to trigger |
| `reference` | The git branch to use (e.g., `main`) |
## Next steps
- [Sources and actions](/docs/notifications/sources-and-actions) — understand which sources and actions are available for each channel type
- [Apply filters to route specific events](/docs/notifications/filters)
- [Manage existing channels](/docs/notifications/manage-channels)
- [Inspect event payloads](/docs/notifications/event-payloads)