---
sidebar_label: Repository and asset setup
doc_id: 215b0f83-7f14-4fa5-8977-6b8e380ec657
description: >-
  Step-by-step guide for configuring code and asset repository providers in
  nullplatform after account creation.
keywords:
  - nullplatform
  - repository setup
  - GitHub
  - GitLab
  - Docker Registry
---

# Repository and asset setup

## Overview

After creating your account, the next step is configuring your providers for both code repositories (GitHub, GitLab, or
Azure DevOps) and asset repositories (Docker Registry, ECR, etc.). This guide shows you how to set up both providers
through nullplatform's dashboard.

## Code repository provider configuration

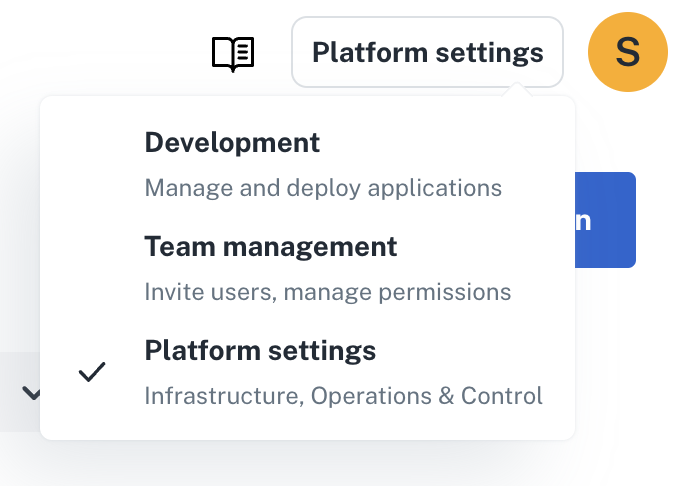
### 1. Access platform settings

Navigate to the platform settings section in nullplatform:

<div style={{ position: 'relative', display: 'inline-block' }}>
<img src="/img/providers/platform-settings.png" style={{width: 300}} />

    <div 
        style={{
            position: 'absolute',
            top: '0',
            left: '0',
            right: '0%',
            bottom: '0',
            border: '1px solid #4A90E2',
            borderRadius: '8px',
            pointerEvents: 'none'
        }}
    />
</div>


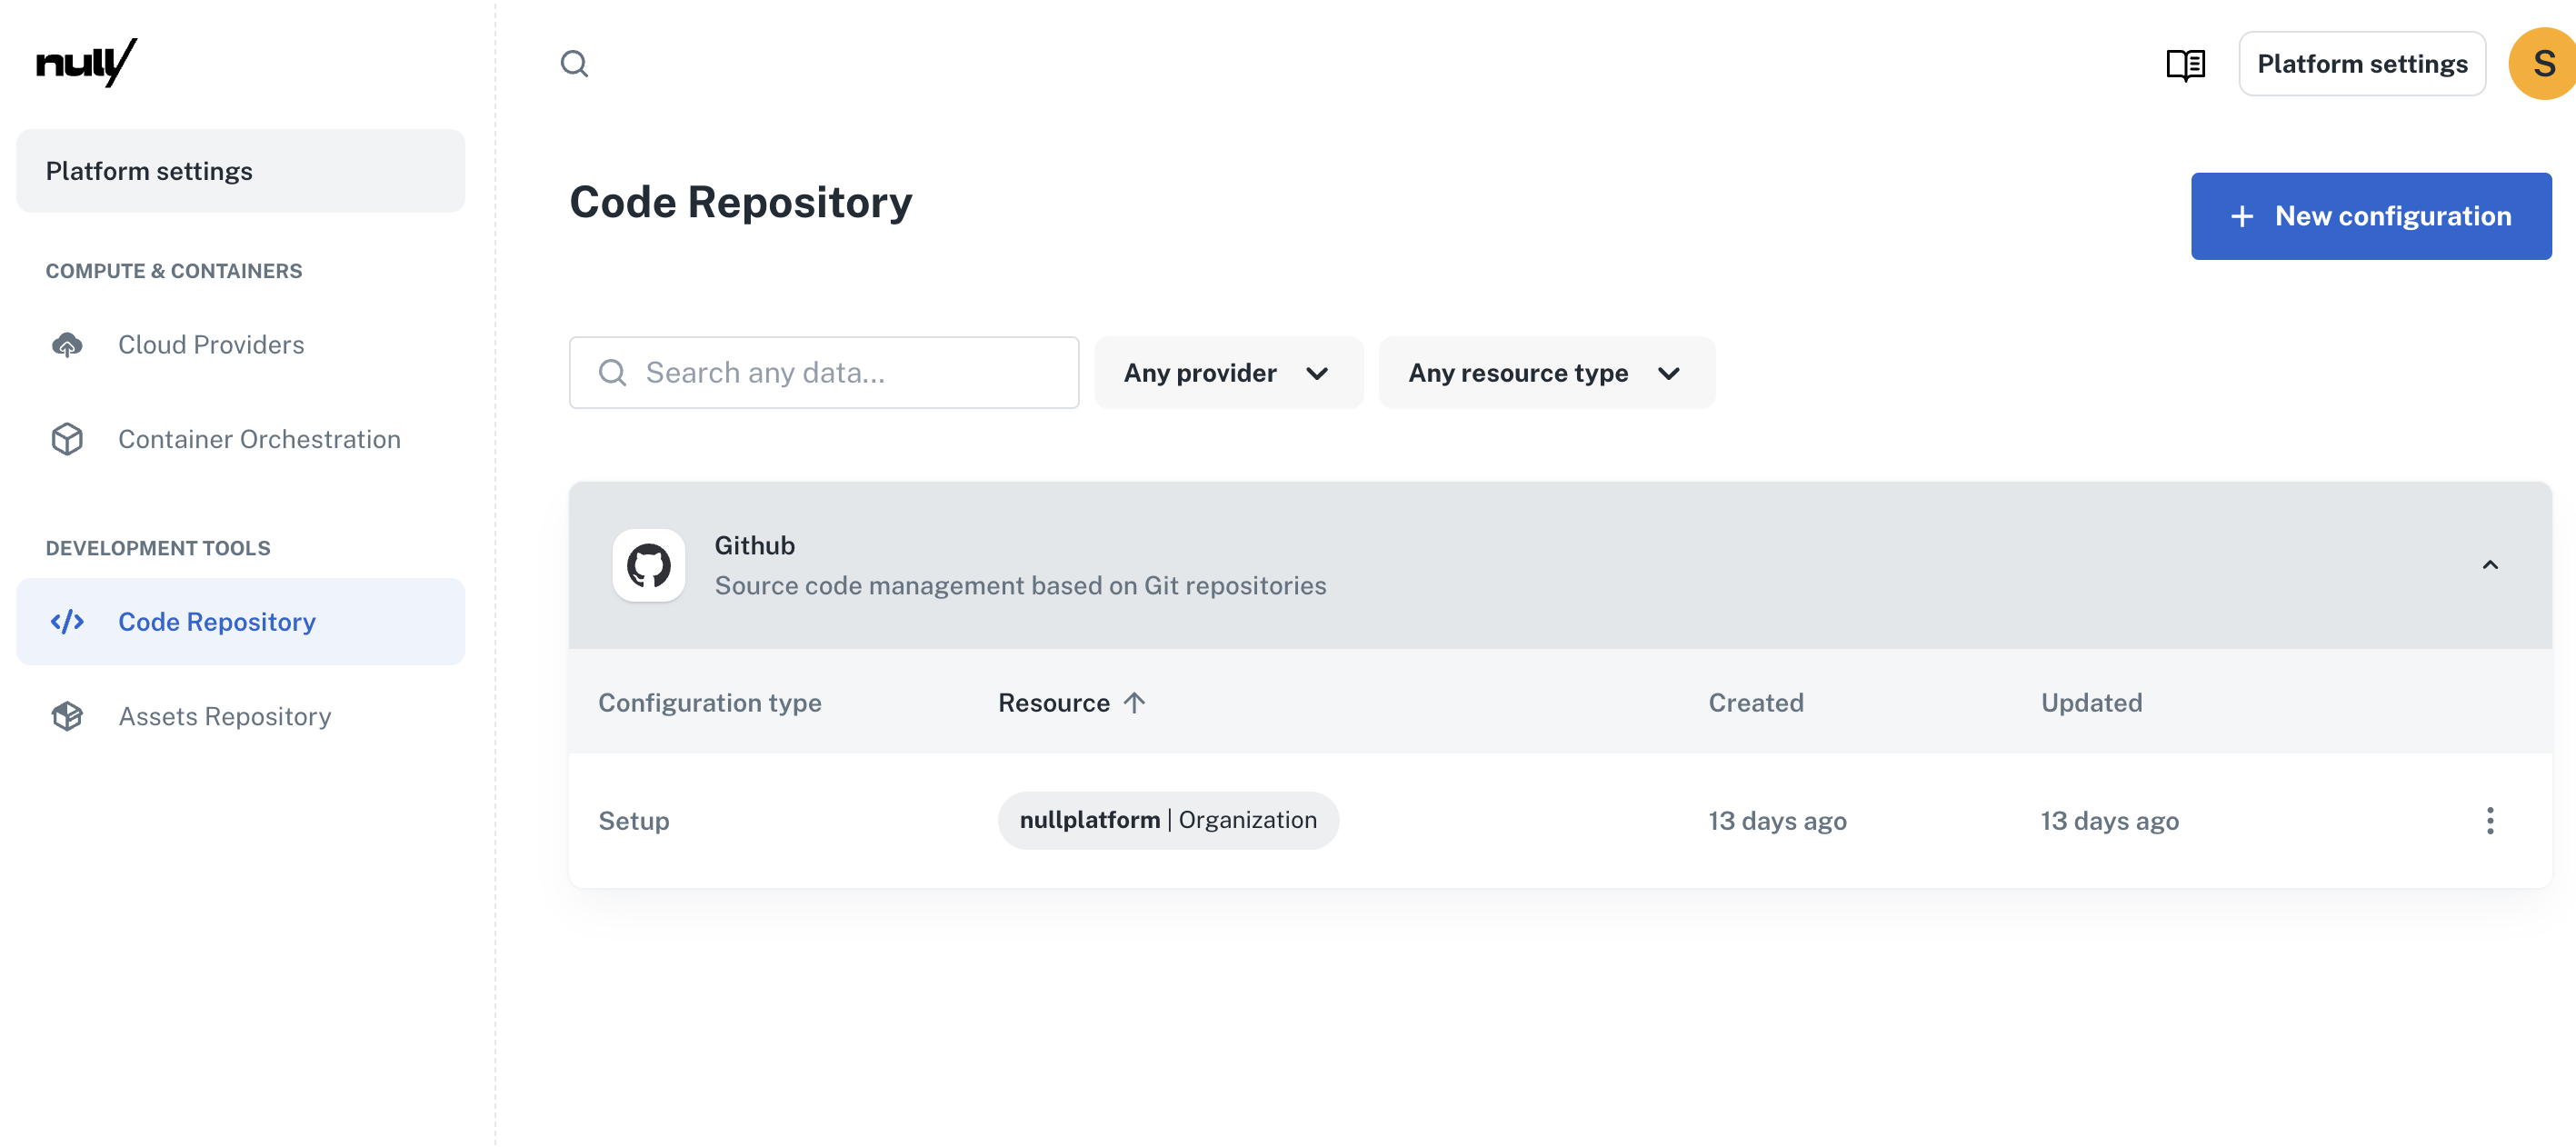
### 2. Navigate to code repository

On the left sidebar of nullplatform, locate and click on the "code repository" tab:

<div style={{ position: 'relative', display: 'inline-block' }}>
    <img
        src="/img/providers/code-repository-overview.png"
        style={{
            clipPath: 'inset(0 80% 0 0)',
            objectFit: 'cover',
        }}
    />
    <div 
        style={{
            position: 'absolute',
            top: '0',
            left: '0',
            right: '80%',
            bottom: '0',
            border: '1px solid #4A90E2',
            borderRadius: '8px',
            pointerEvents: 'none'
        }}
    />
</div>

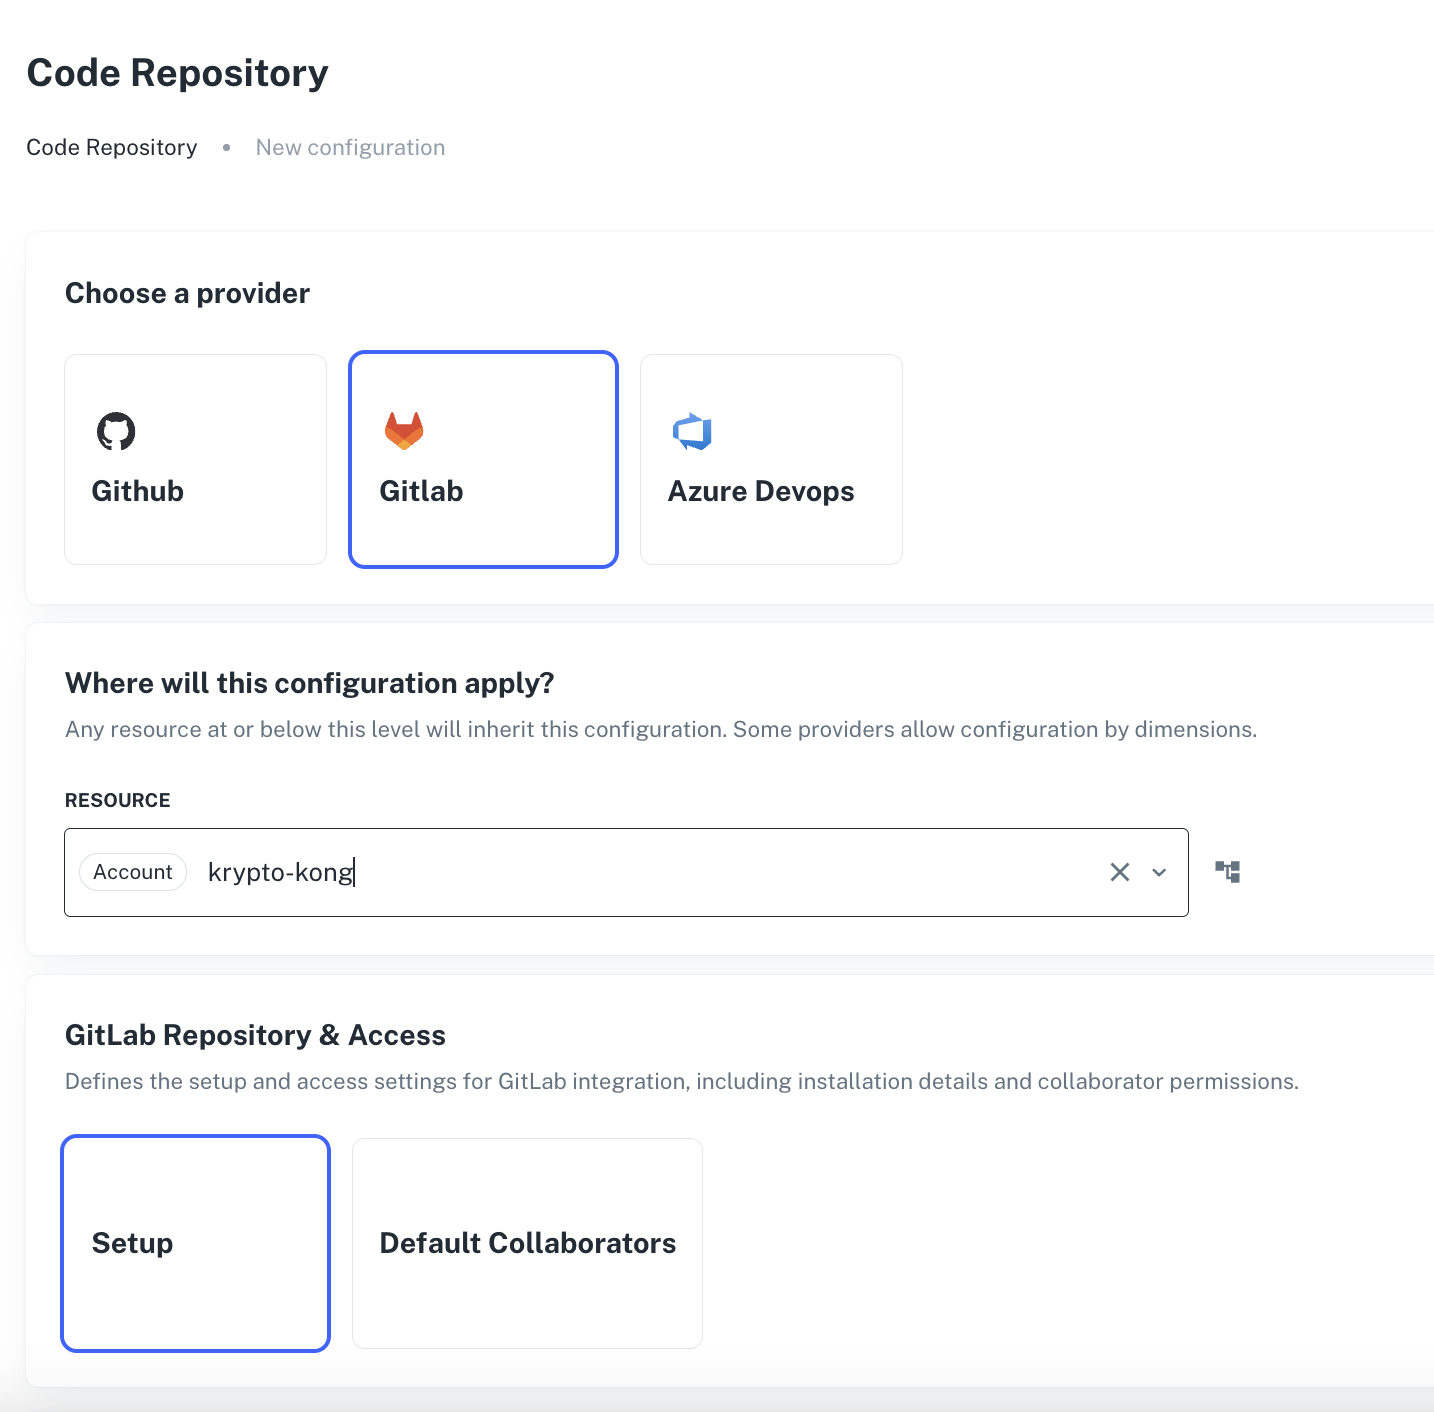
### 3. Create new configuration

Click on the "new configuration" button. You'll be presented with a form to choose your provider:

<div style={{ position: 'relative', display: 'inline-block' }}>
    <img
        src="/img/providers/choosing-gitlab.png"
        style={{
            objectFit: 'cover',
            width: 600
        }}
    />
    <div 
        style={{
            position: 'absolute',
            top: '0',
            left: '0',
            right: '0',
            bottom: '0',
            border: '1px solid #4A90E2',
            borderRadius: '8px',
            pointerEvents: 'none'
        }}
    />
</div>

### 4. Select GitLab provider

For this tutorial, we'll use GitLab as our example. Important: make sure to select the correct account where this
configuration will be applied!

<div style={{ position: 'relative', display: 'inline-block' }}>
    <img
        src="/img/providers/choosing-gitlab.png"
        style={{
            objectFit: 'cover',
            width: 600
        }}
    />
    <div 
        style={{
            position: 'absolute',
            top: '0',
            left: '0',
            right: '0',
            bottom: '0',
            border: '1px solid #4A90E2',
            borderRadius: '8px',
            pointerEvents: 'none'
        }}
    />
</div>

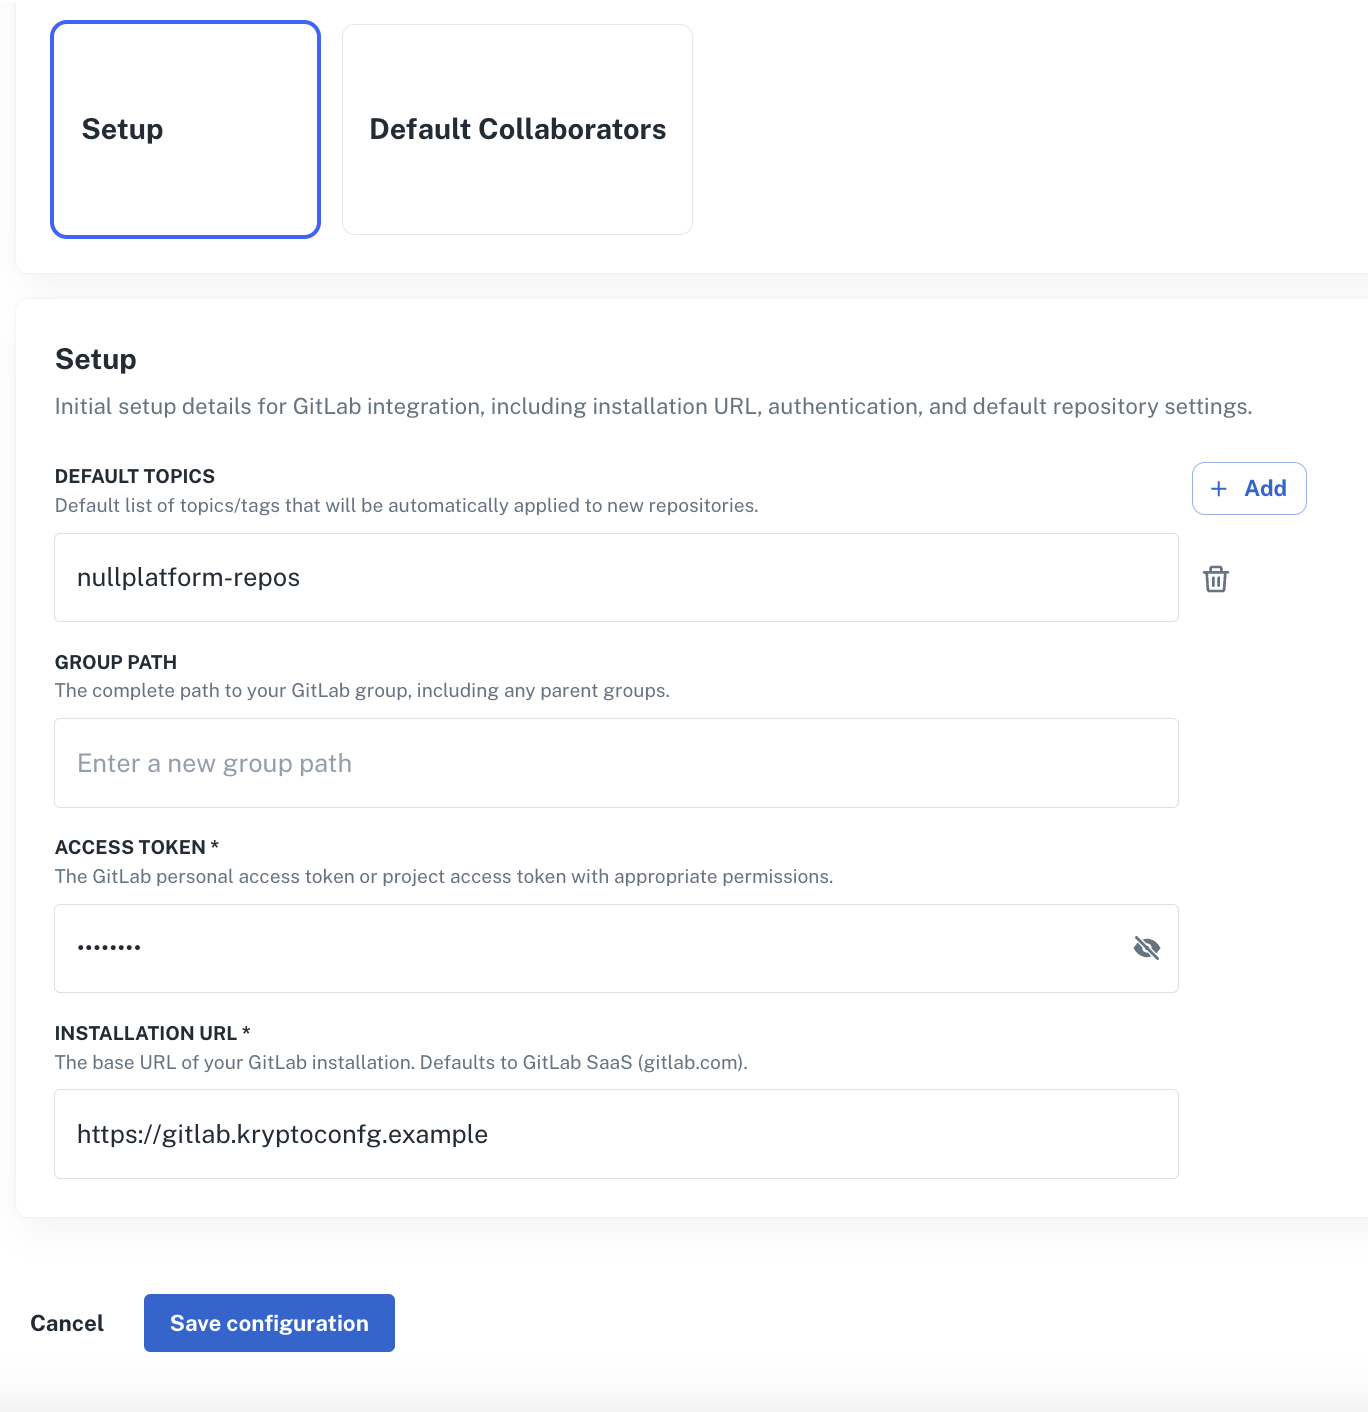
### 5. Configure GitLab

Fill in the required GitLab configuration details:

<div style={{ position: 'relative', display: 'inline-block' }}>
    <img
        src="/img/providers/gitlab-data.png"
        style={{
            objectFit: 'cover',
            width: 600
        }}
    />
    <div 
        style={{
            position: 'absolute',
            top: '0',
            left: '0',
            right: '0',
            bottom: '0',
            border: '1px solid #4A90E2',
            borderRadius: '8px',
            pointerEvents: 'none'
        }}
    />
</div>

## Asset repository provider configuration

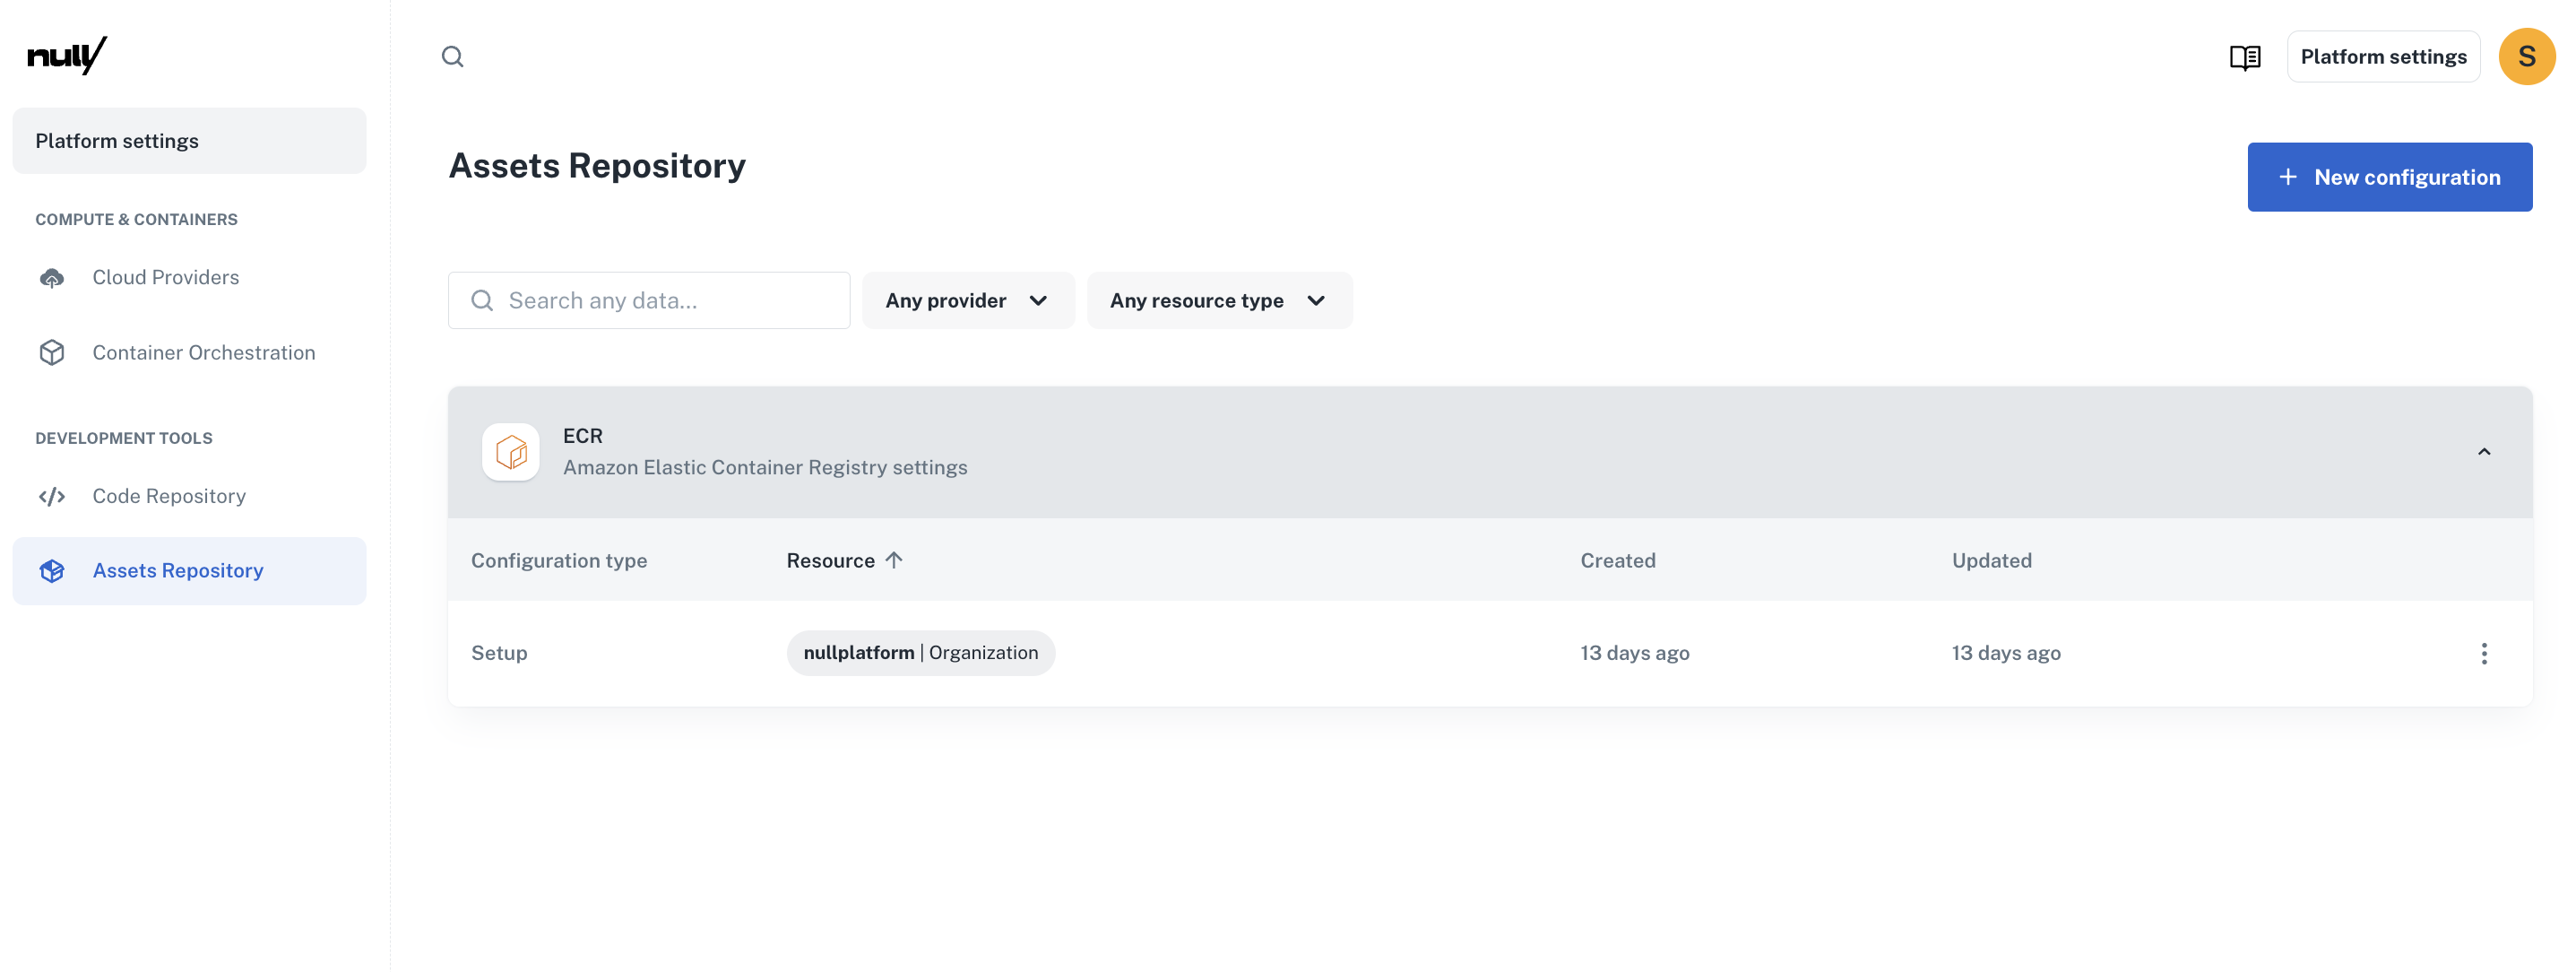
### 1. Navigate to asset repository

Click on the "asset repository" tab in the left sidebar:

<div style={{ position: 'relative', display: 'inline-block' }}>
    <img
        src="/img/providers/asset-repository-overvie.png"
        style={{
            objectFit: 'cover',
            width: 600
        }}
    />
    <div 
        style={{
            position: 'absolute',
            top: '0',
            left: '0',
            right: '0',
            bottom: '0',
            border: '1px solid #4A90E2',
            borderRadius: '8px',
            pointerEvents: 'none'
        }}
    />
</div>

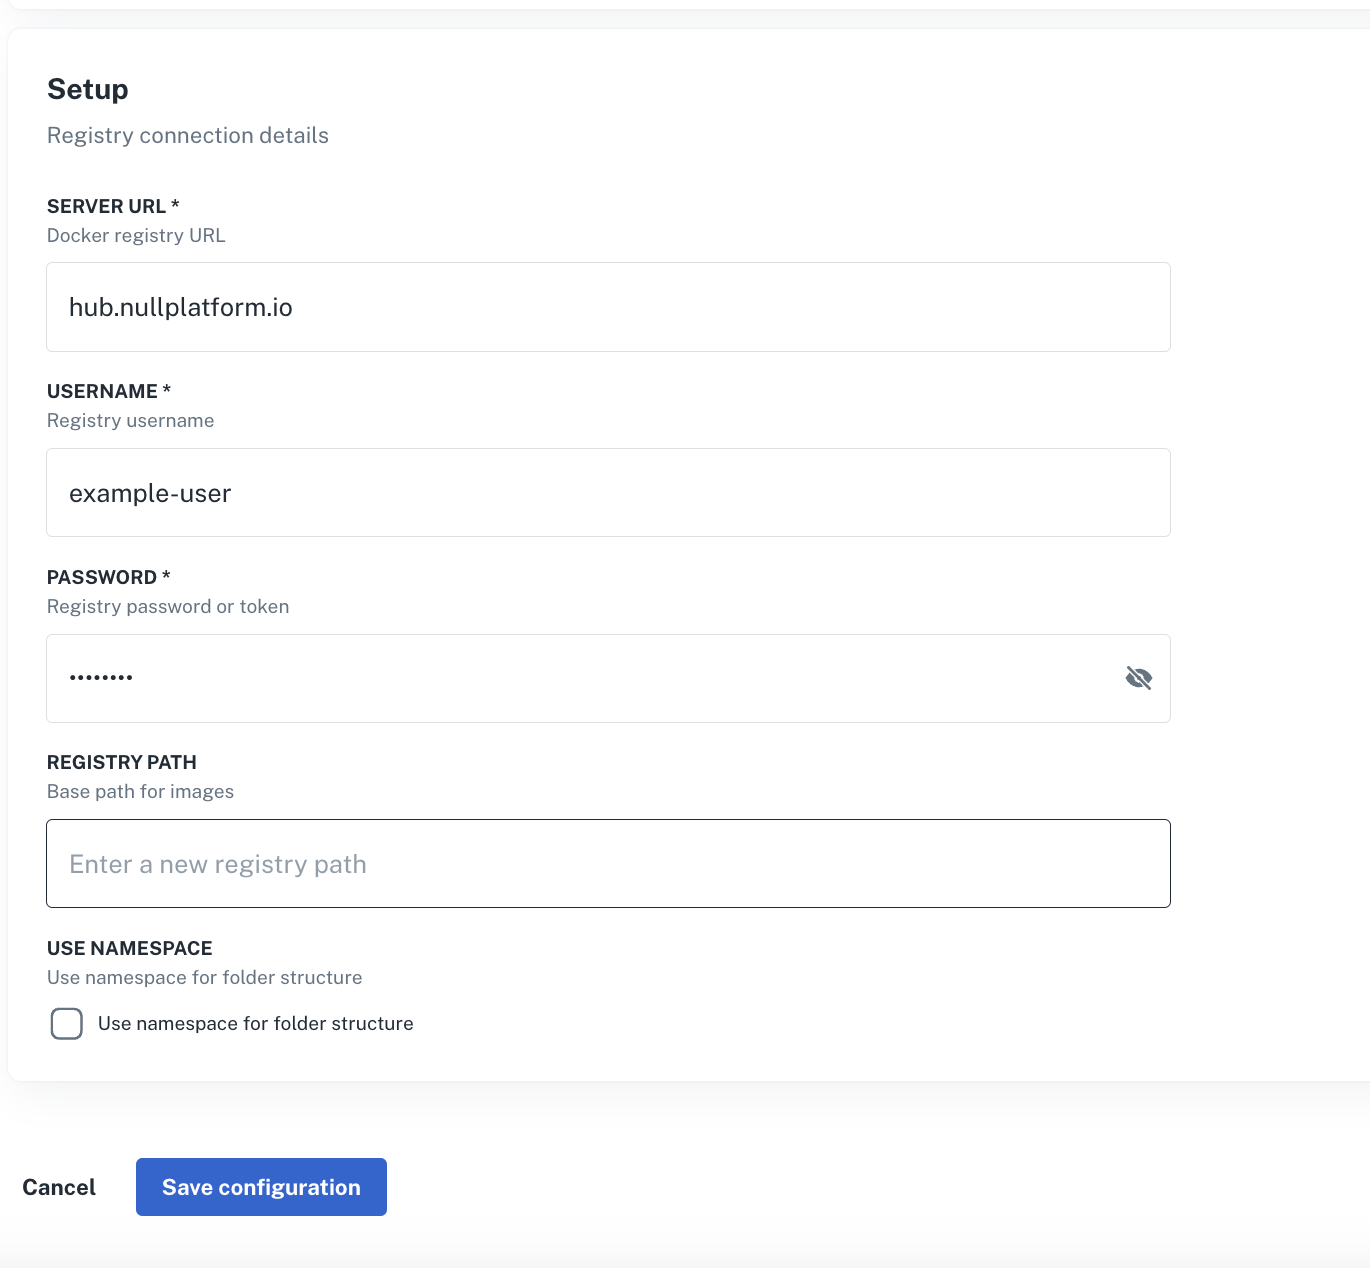
### 2. Create new asset repository

Click on "new configuration" and select "Docker Server". We're using Docker Server as it's the most versatile option and
works with various registries including Harbor:

<div style={{ position: 'relative', display: 'inline-block' }}>
    <img
        src="/img/providers/docker-server-data.png"
        style={{
            objectFit: 'cover',
            width: 600
        }}
    />
    <div 
        style={{
            position: 'absolute',
            top: '0',
            left: '0',
            right: '0',
            bottom: '0',
            border: '1px solid #4A90E2',
            borderRadius: '8px',
            pointerEvents: 'none'
        }}
    />
</div>

### 3. Configure Docker registry

Fill in your Docker registry details.

## Next steps

With both providers configured, you can now:
- Create new applications
- Set up CI/CD pipelines
- Push assets to your configured repositories