Enforce build quality gates for prod deployments
🎯 Goal: Gate production deployments using build catalog metrics. Allow deployments only when Coverage ≥ 80% and No critical vulnerabilities. Otherwise, require manual approval.
Introduction
In many organizations, production releases must pass quality gates. This guide shows how to add build metadata for coverage and vulnerabilities and use it in policies that control deployment to production.
What you’ll set up
By the end of this guide, you'll have:
- A reusable technology template developers can start from (so new apps inherit the same CI and checks).
- Build catalogs for coverage and security on the
buildentity. - A CI workflow that publishes coverage and vulnerability results to each build.
- Approval policies and a deployment approval action that gate production on:
- Coverage ≥ 80%
- No critical vulnerabilities
Prerequisites
You’ll need:
- Terraform/OpenTofu
- Access to your GitHub organization (to clone/push repos used by nullplatform)
- A valid nullplatform API key with roles: Admin, Developer, Ops, SecOps at Organization level
- A Kubernetes cluster with the nullplatform agent running
- The nullplatform CLI installed:
curl https://cli.nullplatform.com/install.sh | sh - Environment variable for the CLI:
export NULLPLATFORM_API_KEY=<your_api_key_here>
1. Create a catalog to add build metadata
Policies read from entity metadata, so declaring catalog schemas ensures the fields exist and are validated consistently across applications.
Create two catalog specs on the build entity: coverage and security.
Replace:
<api-key>with your nullplatform API key.<organization=XXXXXX:account=XXXXXX:namespace=XXXXX>with your NRN.
- IaC
- cURL
terraform {
  required_providers {
    nullplatform = {
      source = "nullplatform/nullplatform"
    }
  }
}

provider "nullplatform" {
  api_key = "<api-key>"
}

resource "nullplatform_metadata_specification" "coverage_metadata" {
  name        = "Coverage Schema"
  description = "Schema for code coverage configuration"
  nrn         = "<organization=XXXXX:account=XXXXX:namespace=XXXXX>"
  entity      = "build"
  metadata    = "coverage"

  schema = jsonencode({
    type = "object"
    properties = {
      code = {
        type = "object"
        properties = {
          coverage = {
            type        = "number"
            minimum     = 0
            maximum     = 100
            description = "Percentage of code coverage"
          }
          lines = {
            type        = "integer"
            minimum     = 0
            description = "Total amount of code lines"
          }
        }
        required             = ["coverage"]
        additionalProperties = false
      }
    }
    required             = ["code"]
    additionalProperties = false
  })
}

resource "nullplatform_metadata_specification" "security_metadata" {
  name        = "Security Schema"
  description = "Schema for security configuration"
  nrn         = "<organization=XXXXXX:account=XXXXXX:namespace=XXXXX>"
  entity      = "build"
  metadata    = "security"

  schema = jsonencode({
    type        = "object"
    title       = "Vulnerability Checks Schema"
    description = "Schema for vulnerability check configuration"
    properties = {
      security = {
        type = "object"
        properties = {
          vulnerabilities = {
            type = "object"
            properties = {
              high = {
                type        = "integer"
                minimum     = 0
                description = "Number of high severity vulnerabilities"
              }
              critical = {
                type        = "integer"
                minimum     = 0
                description = "Number of critical severity vulnerabilities"
              }
            }
            required             = ["high", "critical"]
            additionalProperties = false
          }
        }
        required             = ["vulnerabilities"]
        additionalProperties = false
      }
    }
    required             = ["security"]
    additionalProperties = false
  })
}
If you prefer to use the API, send the following POST requests to our Catalog API.
Coverage schema:
curl -L 'https://api.nullplatform.com/metadata/metadata_specification' \
-H 'Content-Type: application/json' \
-H 'Authorization: Bearer <token>' \
-d '{
  "entity": "build",
  "metadata": "coverage",
  "nrn": "<organization=XXXXXX:account=XXXXXX:namespace=XXXXX>",
  "description": "Schema for code coverage configuration",
  "name": "Coverage Schema",
  "schema": {
    "type": "object",
    "properties": {
      "code": {
        "type": "object",
        "properties": {
          "coverage": {
            "type": "number",
            "minimum": 0,
            "maximum": 100,
            "description": "Percentage of code coverage"
          },
          "lines": {
            "type": "integer",
            "minimum": 0,
            "description": "Total amount of code lines"
          }
        },
        "required": ["coverage"],
        "additionalProperties": false
      }
    },
    "required": ["code"],
    "additionalProperties": false
  }
}
Security schema:
curl -X POST -L 'https://api.nullplatform.com/metadata/metadata_specification' \
-H 'Content-Type: application/json' \
-H 'Authorization: Bearer <token>' \
-d '{
  "entity": "build",
  "metadata": "security",
  "nrn": "<organization=XXXXXX:account=XXXXXX:namespace=XXXXX>",
  "description": "Schema for security configuration",
  "name": "Security Schema",
  "schema": {
    "type": "object",
    "title": "Vulnerability Checks Schema",
    "description": "Schema for vulnerability check configuration",
    "properties": {
      "security": {
        "type": "object",
        "properties": {
          "vulnerabilities": {
            "type": "object",
            "properties": {
              "high": {
                "type": "integer",
                "minimum": 0,
                "description": "Number of high severity vulnerabilities"
              },
              "critical": {
                "type": "integer",
                "minimum": 0,
                "description": "Number of critical severity vulnerabilities"
              }
            },
            "required": ["high", "critical"],
            "additionalProperties": false
          }
        },
        "required": ["vulnerabilities"],
        "additionalProperties": false
      }
    },
    "required": ["security"],
    "additionalProperties": false
  }
}
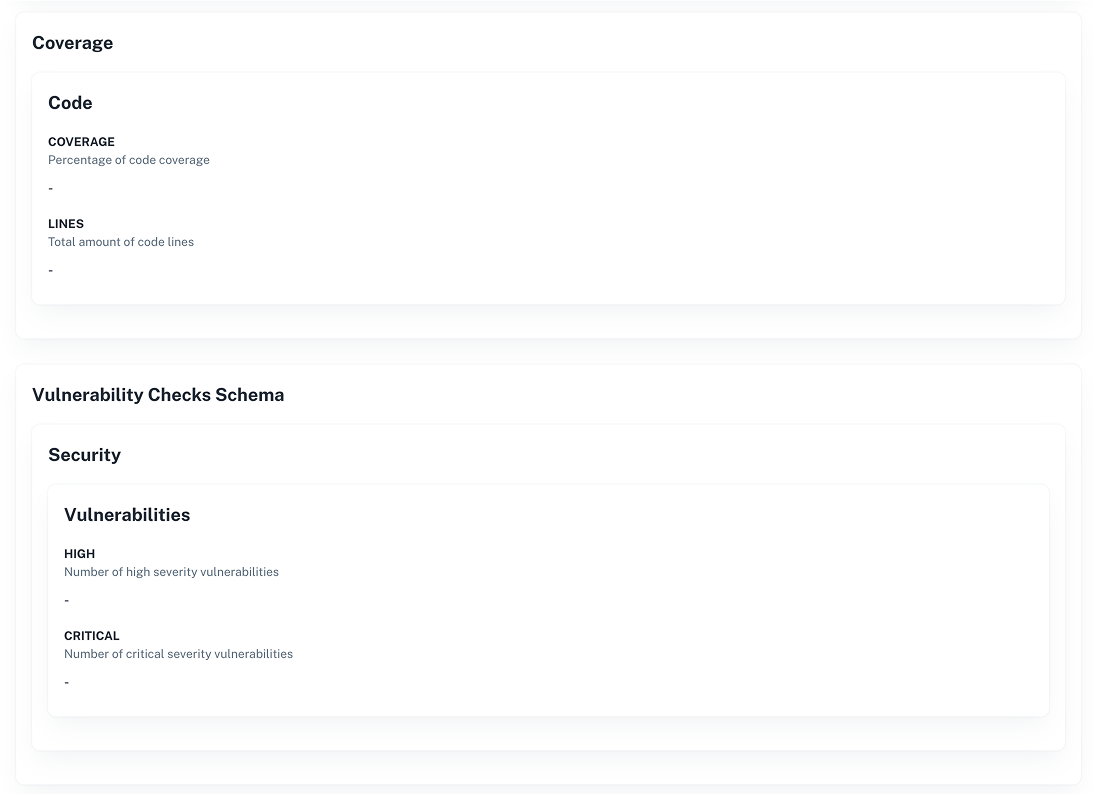
✅ Checkpoint
After applying, run a build to confirm the new fields appear on the build: coverage and security. You should see something like this:
2. Create a namespace and associate a base template
Quick setup
- Create a namespace, e.g. Technology Templates.
- Create a new application using the standard template Any Technology.
Extend the base "Any Technology" template to report coverage and security properties
-
Set the new repository as a template in GitHub settings.
-
Clone the repo locally.
-
Add two files at root level to simulate scan outputs:
coverage.json{
"code": {
"coverage": 70,
"lines": 500
}
}security.json{
"security": {
"vulnerabilities": { "high": 7, "critical": 0 }
}
} -
Replace the CI workflow to publish these metrics to the build during CI:
.github/workflows/ci.ymlname: ci-nullplatform
env:
NULLPLATFORM_API_KEY: ${{ secrets.NULLPLATFORM_API_KEY }}
on:
push:
branches:
- main
permissions:
id-token: write
contents: read
packages: read
jobs:
build:
runs-on: ubuntu-latest
steps:
- name: Check out code
uses: actions/checkout@v4
- name: Install nullplatform CLI
run: curl https://cli.nullplatform.com/install.sh | sh
- name: Add CLI to PATH
run: echo "$HOME/.nullplatform/bin" >> $GITHUB_PATH
- name: Create build on nullplatform
run: np build start
- name: Build Docker image
run: docker build -t my-app .
- name: Push Docker image
run: np asset push --type docker-image --source my-app
- name: Add Coverage
run: |
np metadata create --entity build --data "$(jq -c . coverage.json)"
- name: Add Security
run: |
np metadata create --entity build --data "$(jq -c . security.json)"
- name: Set the build as successful
if: success()
run: np build update --status successful
- name: Set the build as failed
if: failure() || cancelled()
run: np build update --status failed -
Push the changes so future applications created from this template inherit the CI behavior.
3. Register the technology template in nullplatform
- Create the template.
Replace:
<api-key>with your nullplatform API key.<account_id>with your account ID.<github_repository_url>with your repos URL.
- IaC
- cURL
terraform {
  required_providers {
    nullplatform = {
      source  = "nullplatform/nullplatform"
    }
  }
}

provider "nullplatform" {
  api_key = "<api-key>"
}

resource "nullplatform_technology_template" "golang_1_17" {
  name    = "Golang 1.17.9"
  url     = "<github_template_url>
  account = <account_id>

  provider_config = {
    repository = "technology-templates-golang"
  }

  components {
    type    = "language"
    id      = "google"
    version = "1.17"
    metadata = jsonencode({
      "version": "1.17.9"
    })
  }

  tags     = ["golang", "backend"]
  metadata = jsonencode({})
  rules    = jsonencode({})
}
If you prefer to use the API, send the following POST request to our Template API.
curl -X POST -L 'https://api.nullplatform.com/template' \
  -H 'Content-Type: application/json' \
  -H 'Accept: application/json' \
  -H 'Authorization: Bearer <token>' \
  -d '{
    "name": "Golang 1.17.9",
    "organization": <org_id>,
    "account": <account_id>,
    "url": "<github_repository_url>",
    "provider": {
      "repository": "technology-templates-golang"
    },
    "components": [
      {
        "type": "language",
        "id": "google",
        "version": "1.17",
        "metadata": {
          "version": "1.17.9"
        }
      }
    ],
    "rules": {},
    "metadata": {},
    "tags": ["golang", "backend"]
  }
- In another namespace, create a new application using this template.
✅ Result
The first time you run a build with this template, CI will populate the coverage and security metadata.

4. Create approval action and policies
Now that the builds expose these quality checks, define policies to enforce them on production deployments.
Create two approval policies (Coverage ≥ 80%, No critical vulnerabilities) and attach them to a deployment approval action scoped to environment=production. When policies pass > auto-approve. When they fail > manual approval is required.
Replace:
<api-key>with your nullplatform API key.<organization=XXXXXX:account=XXXXXX:namespace=XXXXX>with your NRN.
- IaC
- cURL
terraform {
  required_providers {
    nullplatform = {
      source = "nullplatform/nullplatform"
    }
  }
}

provider "nullplatform" {
  api_key = "<api-key>"
}

resource "nullplatform_approval_policy" "coverage" {
  nrn  = "<organization=XXXXXX:account=XXXXXX:namespace=XXXXX>"
  name = "Code Coverage"
  conditions = jsonencode({
    "build.metadata.coverage.coverage" = { "$gte": 80 }
  })
}

resource "nullplatform_approval_policy" "security" {
  nrn  = "<organization=XXXXXX:account=XXXXXX:namespace=XXXXXX>"
  name = "Security"
  conditions = jsonencode({
    "build.metadata.security.critical" = { "$eq": 0 }
  })
}

resource "nullplatform_approval_action" "deployment_create" {
  nrn    = "<organization=XXXXXX:account=XXXXXX:namespace=XXXXXX>"
  entity = "deployment"
  action = "deployment:create"

  dimensions = {
    environment = "production"
  }

  on_policy_success = "approve"
  on_policy_fail    = "manual"

  lifecycle {
    ignore_changes = [policies]
  }
}

resource "nullplatform_approval_action_policy_association" "coverage" {
  approval_action_id = nullplatform_approval_action.deployment_create.id
  approval_policy_id = nullplatform_approval_policy.coverage.id
}

resource "nullplatform_approval_action_policy_association" "security" {
  approval_action_id = nullplatform_approval_action.deployment_create.id
  approval_policy_id = nullplatform_approval_policy.security.id
}
If you prefer to use the API, send the following POST requests to our Approval API.
-
Create the approval action (
deployment:create)curl -X POST -L 'https://api.nullplatform.com/approval/action' \
-H 'Content-Type: application/json' \
-H 'Accept: application/json' \
-H 'Authorization: Bearer <token>' \
-d '{
"nrn": "<organization=XXXXXX:account=XXXXXX:namespace=XXXXXX>",
"entity": "deployment",
"action": "deployment:create",
"dimensions": {
"environment": "production"
},
"on_policy_success": "approve",
"on_policy_fail": "manual"
} -
Create the policies
Policy: Code Coverage (≥ 80):
curl -X POST -L 'https://api.nullplatform.com/approval/policy' \
  -H 'Content-Type: application/json' \
  -H 'Accept: application/json' \
  -H 'Authorization: Bearer <token>' \
  -d '{
    "nrn": "<organization=XXXXXX:account=XXXXXX:namespace=XXXXX>",
    "name": "Code Coverage",
    "conditions": {
      "build.metadata.coverage.coverage": { "$gte": 80 }
    }
  }
Policy: Security (critical == 0)
curl -X POST -L 'https://api.nullplatform.com/approval/policy' \
  -H 'Content-Type: application/json' \
  -H 'Accept: application/json' \
  -H 'Authorization: Bearer <token>' \
  -d '{
    "nrn": "<organization=XXXXXX:account=XXXXXX:namespace=XXXXXX>",
    "name": "Security",
    "conditions": {
      "build.metadata.security.critical": { "$eq": 0 }
    }
} -
Associate the policies to the action.
Use the
idreturned by the action creation for<approval_action_id>, and the id from each policy creation for<coverage_policy_id>/<security_policy_id>.Associate Coverage policy:
curl -X POST -L 'https://api.nullplatform.com/approval/action/<approval_action_id>/policy' \
-H 'Content-Type: application/json' \
-H 'Accept: application/json' \
-H 'Authorization: Bearer <token>' \
-d '{
  "policy_id": <coverage_policy_id>
}'
Associate Security policy
curl -X POST -L 'https://api.nullplatform.com/approval/action/<approval_action_id>/policy' \
  -H 'Content-Type: application/json' \
  -H 'Accept: application/json' \
  -H 'Authorization: Bearer <token>' \
  -d '{
    "policy_id": <security_policy_id>
  }'
Test that it works
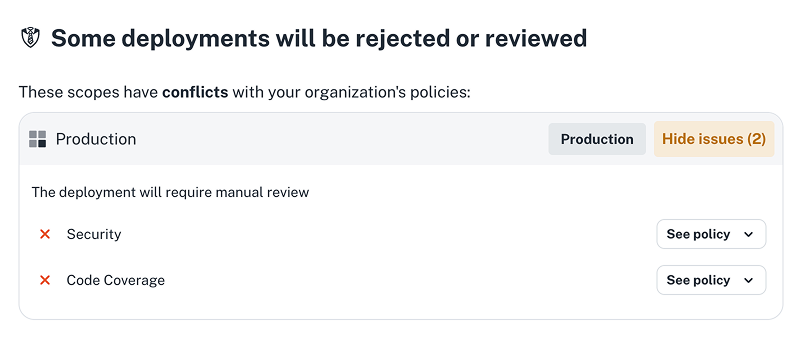
- Create a release, a production scope, and trigger a deployment.
- If policies aren’t met, deployment will require manual approval. You can wire approvals to Slack (or any supported messenger).
💡 Tip: Tweak
coverage.json/security.jsonto simulate different scenarios.
Wrap-up 🎉
All done! Now you have:
- Defined build metadata for coverage and vulnerabilities.
- Updated your CI to publish those metrics to every build.
- Created approval policies and a deployment approval action that turn metrics into production gates.
This gives you objective, auditable production decisions and a reusable template teams can adopt quickly.
What’s next
Head to Application metadata and PCI approval policy to add Owner, SLO, and PCI fields and require manual approval for PCI applications in production. Combined with what you just implemented here, you’ll have a complete, metadata-driven production policy.
👉 Use application catalog to require PCI approvals in production