Setting up your override environment
If you already have an agent-backed scope running and want to extend its behavior, you'll need to prepare your environment so that nullplatform can find and execute your custom logic.
This setup is required whether you're applying configuration tweaks or fully replacing workflows.
1. Choose a base scope to extend
Overrides are always built on top of an existing scope. This guide assumes you’re extending our prod-ready Containers scope, but you can use any agent-backed scope as your base.
💡 You won’t modify the base repository directly. Instead, you’ll reference it from your own override repository.
2. Prepare your override repository
Your override repository stores the configuration and workflow files that will extend the base scope.
Create a Git repository and include the following files:
values.yaml— for configuration (runtime value) overrides.- Workflow files — for behavior overrides (e.g.,
create.yaml,deploy.yaml).
Your repo might look like this:
your-override-repo/
├── values.yaml
├── scope/workflows/
│ ├── create.yaml
│ └── delete.yaml
├── deployment/workflows/
│ └── initial.yaml
└── ...
Each file in your override repo extends or replaces part of the base scope logic.
3. Update your notification channel
Your notification channel tells the agent when and where to run commands. Because you already have a channel configured for your base scope, you’ll only need to update it to include your override path.
This ensures the agent knows where to look for your custom workflows.
Update via the UI:
-
Go to Platform settings > Notifications > Channels.
-
Locate your existing Agent channel and click it to edit.
-
Scroll to the Command configuration section.
-
In CMDLINE, you’ll see your current base scope path—for example:
/root/.np/nullplatform/scopes/entrypoint -
Add your override repository path to the command, using the
--overrides-pathflag:/root/.np/nullplatform/scopes/entrypoint --overrides-path=/root/.np/your-org/your-override-repo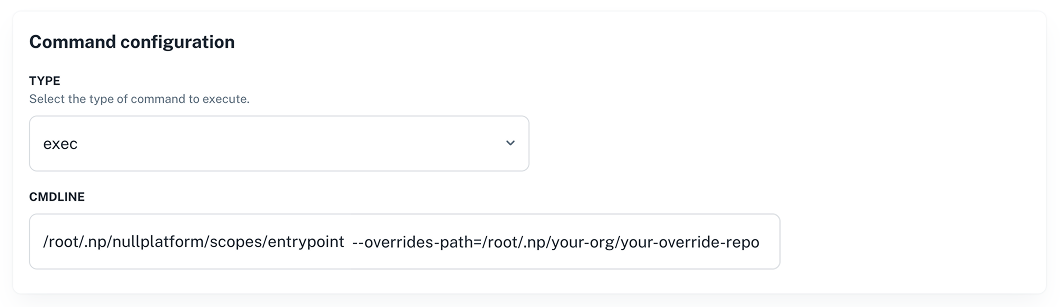
Alternatively, you can update this channel through the Notification channel API.
4. Update the agent configuration
Your agent must also know where your override code lives so it can clone and run your changes.
Set the following environment variables:
export NP_API_KEY=<your_api_key>
export AGENT_TAGS=<"key:value">
export AGENT_REPO="https://git-provider/your-org/your-override-repo.git#main,https://github.com/nullplatform/scopes.git#main"
Then, upgrade the running agent using Helm:
helm upgrade nullplatform-agent nullplatform/nullplatform-agent \
--set configuration.values.NP_API_KEY=$NP_API_KEY \
--set configuration.values.TAGS="$AGENT_TAGS" \
--set configuration.values.AGENT_REPO=$AGENT_REPO
You should see a message like this once the agent reconnects:
{"level":"info","time":"2025-08-05T16:40:56.721Z","message":"Commands Executor connected"}
For more info on the nullplatform agent, check our Agent docs.
You’re ready to apply overrides
Once your agent is running and the channel is configured, your custom logic will be picked up and applied during scope execution.
From here, you can: